
If you’re trying to wrap your head around campervan wiring and everything else that comes with it, you’re in the right place. This guide takes an otherwise overwhelming process and simplifies it. So that by the end, even total beginners will be ready to take on the job of wiring a campervan.
When it comes to converting a campervan, one of the most daunting aspects of the build is the electrics.
Nevertheless, the reliability of your electrical system can make or break van life. It’s imperative that your system is not only suitable for your needs but that it’s safe as well.
If you haven’t already planned out the electrical system you’ll need in your van, this might not be the best article for you. I’d recommend reading this beginner’s guide to campervan electrics first.
But if you’ve done your planning, bought your core components, and feel ready to start your campervan wiring, then you’ll want to keep reading.
I’m going to break up the process into 10 digestible stages. Starting with the materials you’ll need, up to creating a campervan wiring diagram, and ending with the actual wiring itself.
I was a complete novice when it came to electrics. And since the multitude of (often conflicting) information online can be overwhelming, this is the kind of guide I wished I had when starting out.
Despite this, I successfully installed both a 12v (DC) and a 240v (AC) system in our van. Alongside a solar power system that allows us to be totally off-grid.
I’m confident I can help you to do the same.
So let’s get to it. Here’s everything you need to know about campervan wiring in 10 digestible stages.
Jump to...
Disclosure: Some of the links in this post are affiliate links. If you purchase a product through these links, we will earn a small commission at no extra cost to you. And we can continue bringing you free tips and advice. If you found the content helpful and are kind enough to use our affiliates – you are awesome, and we thank you!
How to Wire Your Campervan
Disclosure: I am not a qualified auto-electrician, and my advice shouldn’t be taken as such. I wrote this article based on my own experience, but it shouldn’t replace the guidance of a licensed professional.
The 10 Stages of Campervan Wiring
- Tools & components
- When to Start
- Understanding Electrical Circuits
- Cable types, sizes & lengths
- Fuses & Circuit Breakers
- Connectors
- Earth Point/Grounding
- Campervan Wiring Diagram
- Wiring your camper van
- Safety Tips

Watch Our Van Tour Vlog
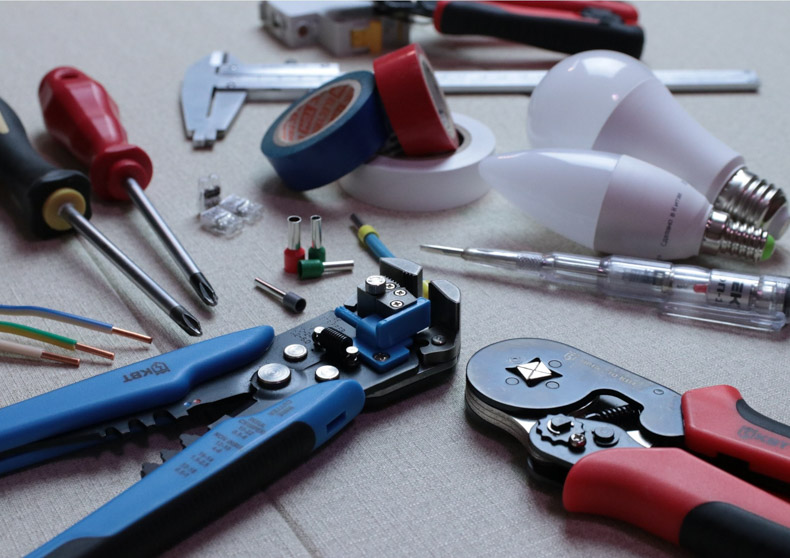
Step 1 - Tool & components
For me, one of the most frustrating things about wiring our campervan was figuring out all the required tools and components.
I can’t tell you how many times I sat down to do a job, only to find I was missing the right tool or component. That’s largely due to my lack of experience, but I think many of you are in the same boat.
With that in mind, I’d allow yourself a good few weeks to gather everything that you need.
I’ll do my best to list everything you’ll need here, but things like cable sizing and fuses will all depend on your setup.
This list is based on the assumption that you already have your core components like batteries, solar panels, and appliances.
If you don’t have all that, you might want to refer to the following printable tick list.
DC (12 v) Components
Battery Terminals – These attach directly to your batteries and provide a connection source for everything else in the circuit.
Battery Terminal Covers – Once your wiring is complete, these covers are placed over the terminals to keep them safe.
Heavy-Duty Connector – For chunkier cables, you’ll require heavy-duty connectors to connect them to your battery terminals and other appliances.
Crimp Connectors – For smaller wires, you’ll need smaller connectors.
Heat Shrink Tubing – A plastic tube used to insulate (protect) wires. It shrinks when exposed to heat. Exposed copper wire can be dangerous, so proper insulation is necessary.
Red and Black Cable – Red (positive) & Black (negative) cables come in various lengths and sizes. Be sure to study section 4 carefully to ensure you use the correct wires.
Conduit – Plastic tube to keep your camper van wiring tidy and protected.
Circuit Breakers – Circuit breakers are used to isolate your circuits. They serve both as a safety device and as a switch. More on that in section 5.
Blade Fuses – Fuses also act as a safety device. Again more on these in section 5.
Blade Fuse Block with Bus Bar – fuse block or holder allows you to hold multiple fuses in one location.
Switch Panel – A switch panel allows you to isolate appliances and switch them off without shutting off the entire system.
Miscellaneous – Cable Ties, Wire Labels, Nuts & Bolts
AC (Mains Power) Components
Mains Hook Up Inlet – A flush-fitting inlet that attaches to the side of your van to enable shore power electricity.
Mains Extension Lead – For you to connect your camper to shore power supply.
3-Core Cable – Standard mains power cable with 3 cores (a live, neutral, and earth).
Motorhome Consumer Unit – Like the fuse box you have in your home, but (probably) a smaller version.
Battery Charger – When connected to mains power, you can use the battery charger to top up your batteries.
Plug Sockets – To plug in your battery charger and any other AC appliances.

Solar Panel Components
PV Array DP Isolator Switch – An isolating switch that enables you to isolate the circuit of your solar panels.
MPPT Solar Charge Controller – Ensures the very best performance of your solar panels while regulating the current.
Tools
Standard Crimping Tool – When attaching connectors to smaller wires, these standard crimping tools work like a charm.
Hydraulic Crimping Tool – For larger wires and connections, you’ll need this heavy-duty tool to get a robust crimp. If you only have a few large wires, it might be more cost-effective to buy pre-crimped cables instead.
Soldering Iron (Optional) – Some prefer to solder rather than crimp, resulting in a more robust connection.
Multimeter – Used to test electrical circuits and identify discrepancies – an indispensable tool.
Wire Cutters – Does what it says on the tin, but personally, I find a hack saw more efficient.
Wire Strippers – US / UK – Strips the insulation off wires to allow for crimping or soldering.
Torch Lighter – To shrink your shrink wrap tubing.
Other – Drill, pliers, screwdriver set, spanners, Stanley knife.

Step 2 - When to Start Your Campervan Wiring
We learnt many lessons throughout our van build process. One of them is that we wished we’d planned out our electrical system sooner rather than later.
When you’re developing a blueprint for your van layout, take this opportunity to plan out your electrics as well.
Unfortunately, we failed to do this, and it bit us on the arse later on. Here’s what to do so you can avoid the same headaches.
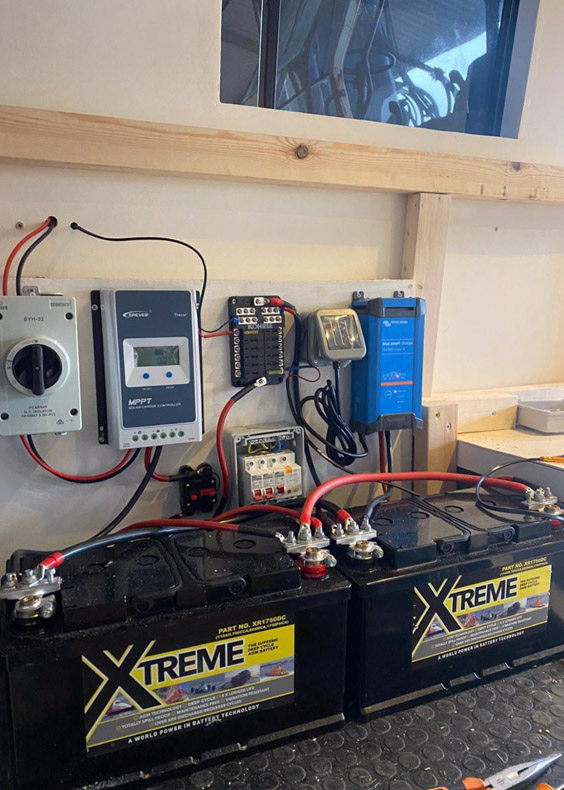
- Have a plan of where you will house your ‘garage’. This is where you will store your batteries, fuse blocks, switches, etc.
- Our garage is at the back of the van underneath the bed. You want somewhere that’s easily accessible but also protected.
- Plan where you want all appliances and sockets to be and the best route to run cables to them.
- You want to keep cable runs as short as possible and on the inside of the van.
- After you’ve insulated but before laying any floors, walls, or cladding, run the cables to their relevant positions.
- Use conduit to keep things tidy and to allow you to run additional cables should you need to.
- Be sure to label each end of the cables to know what they are for.
- Use more than enough cable to allow for contingency purposes. You can always trim off more later on.
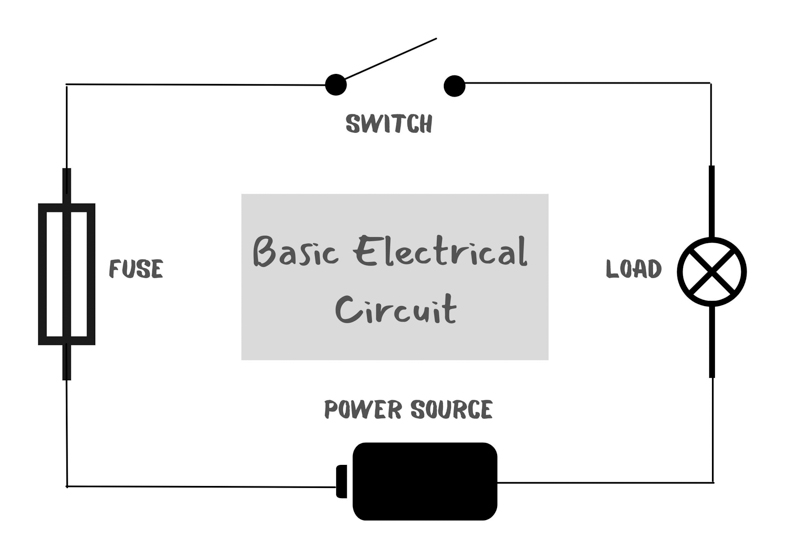
Step 3 - Understanding Electrical Circuits
Before we get into the nitty-gritty stuff, it’s wise to understand the basic principles of electrics.
Above is a fundamental diagram of what a typical electrical circuit might look like.
A circuit is a closed-loop or pathway for transmitting electric current. You will have multiple circuits in your van that produce electricity for each element of your system.
Don’t worry if it doesn’t all make sense now. I promise it will as we go along, and you can refer back to the diagram as and when you need to.
Related Read

Step 4 - Cable Types, Sizing & Lengths
In your standard van build, there will be a number of appliances that need wiring.
Obvious things include fridges and lighting. But there are other things to consider like solar panels, ventilation fans, heaters, and water pumps.
It can seem like a daunting task, I know. However, armed with the advice in this section, you’ll soon have the confidence to wire your camper yourself.
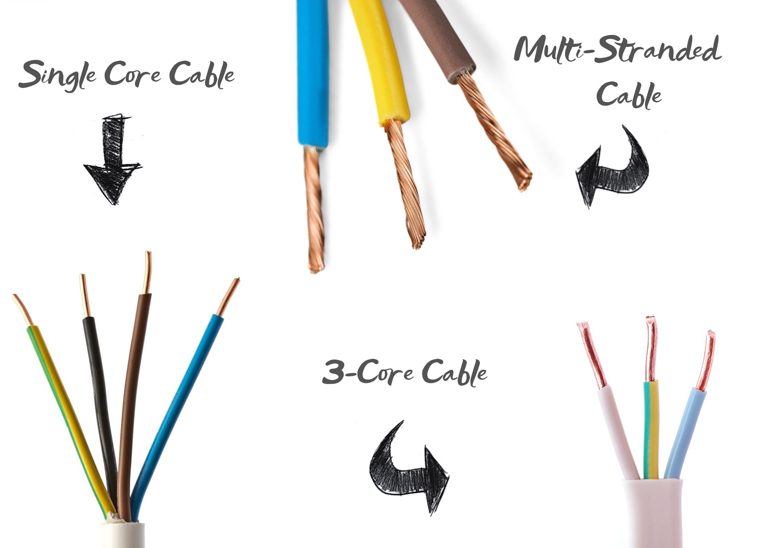
Types of Cable
First, let’s talk about some of the different types of cable available:
1. Solid Core Cable – This type of cable uses one solid copper wire per conductor. It’s typically used in households and other permanent infrastructure.
It’s not recommended that you use this type of wire in your campervan because it easily snaps when over-flexed.
When you encounter bumpy roads, it can cause vibration and movement in the van, putting pressure on the wires. So really, you need something more flexible.
2. Multi-Stranded Cable – Multi-stranded wiring is made up of lots of tiny copper cores. It is far more flexible than single solid core and less susceptible to snapping.
Even if a few of the copper cores snap due to wear and tear, there are still plenty of other strands to conduct electricity through.
As such, it’s a far better choice of cable to have in your campervan.
3. Single core/2-core/3-core cable – When you hear terms like single-core, 2-core, or 3-core cable, it refers to how many individual insulated wires are beneath the outer sheaf.
A single core cable has one conducting wire (e.g. positive), a 2-core has two (e.g. positive & negative), and 3-core has three (e.g. live, neutral, and earth).
Cable Sizing & Lengths
Now we know the type of cable we want to use in our campervan, it’s time to work out cable sizing.
As a rule of thumb, the more amps you’re trying to put through a cable, the thicker the cable needs to be. But there are a few other factors to consider as well:
- The total current passing through the wire at any given time.
- How the cables have been installed.
- The distance between the power source and the appliance/socket.
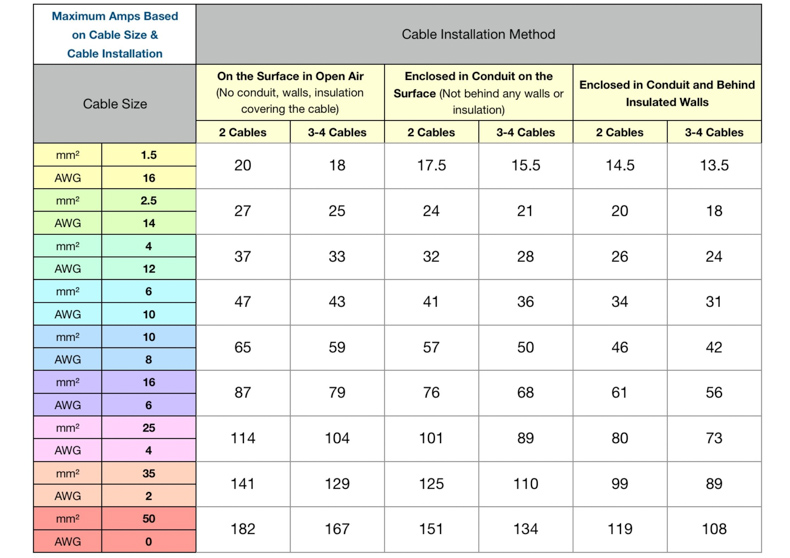
Above is the table I’ve put together based on the wiring regulations of the British standard. It might not make much sense yet, but it’s for you to refer back to as we go along.
We must use the correct size cables when wiring our campervan. If the wire is too small for the load, you risk burning the cable out and potentially causing a fire.
Also, the one thing that the table doesn’t cover is the length of the circuit. With low voltage electrics, you’ll inevitably experience a voltage drop when using longer lengths of cable – sometimes up to 10%.
With all this in mind, it’s always a good idea to slightly oversize your cables. However, not overly so since cables can be expensive.
Appliance Cable Sizing
Let’s look at some examples in our van and how we went about calculating cable sizing.
Example 1 –
- Our Shurflo 12v Water Pump has a current rating of 4.5 amps.
- Since it’s located towards the front of the van, we had to use around 4 metres of cable.
- It’s enclosed in conduit but not behind an insulated wall
- Therefore, if we refer to the table above, a 2.5mm2/14 AWG sized cable is plenty big enough.
Example 2 –
- Our 12v Compressor Fridge has an average power consumption of 60 watts.
- To work out the current rating in amps, we use “watts law” (Watts/Volts=Amps). So 60 watts divided by 12 = 5 Amps.
- Since the fridge is close to the batteries, we used around 2 metres of cable.
- The wire is enclosed behind an insulated wall.
- If we refer to the table above, a 1.5mm2/16 AWG sized cable is ample.
- However, since there is a surge in power when you first switch the fridge on, the manufacturer recommends using a wire & fuse rated at 15 amps. So we used a 4mm2/12 AWG cable.
- So now you have an idea of how to work out the cable sizing for each of your appliances.
- However, it’s also a good idea to check the manufacturer’s guidelines in case there are any irregularities like our fridge.
Fuse Block to Battery Cable Sizing
Each of your 12-volt appliances should be protected with a fuse (more on fuses in the next section).
As we tend to have multiple devices in our van, it’s best to use a fuse block or blade fuse holder. These have various outputs for our appliances and one input that draws power from the batteries.
When wiring the fuse box to our batteries, we need to calculate a total load of all of our appliances.
Even if you don’t anticipate all of them running simultaneously, it’s still recommended to work on a worst-case scenario.
Say the total load of all of our appliances is 60 amps. By referring to the table, you’ll see that you need a 10mm2/8 AWG sized cable to wire the batteries to your fuse box.
Solar Panel to Battery Cable Sizing
To calculate the cable sizing for our solar panels, we use the same rules for the most part. Let’s look at another example.
- Say we have 1 x 160 Watt solar panel
- To work out the current in amps, we use “watts law” (Watts/Volts=Amps). So 160 watts divided by 12 = 13.33 Amps.
- Since it’s located on the roof of our van, we have to use around 5 metres of cable.
- It’s enclosed in conduit but not behind an insulated wall
- Therefore, if we refer to the table above, a 4mm2/12 AWG sized cable is sufficient
So what happens when we have more than one solar panel? Do we need to use a bigger cable? The answer is: not necessarily.
If you wire your panels in parallel, the volts stay the same, but the amps increase, meaning you’d need to use thicker cables.
Whereas, if you wire your solar panels in series as we have, you can use the same size cable as you would if you only had the one.
That’s because (without getting overly technical) when you wire in series, it’s the voltage that’s added together and not the amps. So the amps stay the same, allowing you to keep your cable sizes small.
It’s then the job of your MPPT Solar Charge Controller (which you should definitely have, by the way) to take that high voltage, transform it to a lower voltage, and increase the amps.
When it comes to wiring our charge controller to our batteries, however, we need to consider the amp rating of our controller.
As we know, the amps determine the size of the cable. So when wiring our charge controller to our batteries, we need a cable that can handle the maximum current rating of the controller.
So if you have a 40 amp solar charge controller, you want to use a wire that’s at least 10mm2/8 AWG. In our case, we used a 16mm2/6 AWG to be on the safe side.
Related Read

Battery to Battery Cable Sizing

If you have more than one battery, you will want to wire them together in parallel. This allows you to draw the highest amount of amp hours while keeping the voltage the same.
The cables that connect your batteries need to be rated for the sum of all your connected loads. Again you want to assume that everything will be running at the same time.
We worked out that our total load would never exceed anywhere close to 100 amps at any given time. But we opted for a 35mm2/2 AWG cable just to be on the safe side.
(AC) Mains Power Cable Sizing
If you’re having mains power hook up and sockets in your van, this is the final cable sizing you’ll need to consider. Thankfully this one doesn’t require much of an explanation.
To avoid overcomplicating things, let’s just say that a 2.5mm2/14 AWG 3-core cable will be plenty sufficient.
2.5mm2/14 AWG 3-core cable is used in most domestic situations; therefore, it’s certainly adequate for wiring your campervans AC system.
Step 5 - Fuses, Breakers, and Switches
The next step is to understand fuses, breakers and switches and their roles in our camper vans’ electrical system.

Blade Fuses
When it comes to your campervan wiring, you’ll want to ensure that every 12-volt appliance has a blade fuse on the live side of the circuit.
When using the correct size fuse, it acts as a safety mechanism. So, should there ever be a problem with the circuit or the appliance it is powering, the fuse will blow and break the circuit.
Without a correctly-sized fuse, you risk damaging the battery and the appliance. Or worse, causing a fire or electrocuting yourself.
Fuse sizes should be no more than 1.5 times the total load on the system; however, in a camper van, you want it to be as close as possible.
So, for example, an appliance with a total current rating of 4.5 amps would use a 5 amp fuse. If you used a 4 amp fuse, it would likely overload and blow the fuse.
You can also refer to the manufacturer manuals for each appliance, as they’ll often state a recommended fuse size.
Circuit Breakers
A circuit breaker acts in a similar way to a fuse. When it senses an issue or a current greater than its amp rating, it trips the circuit preventing damage to the system.
The core difference with circuit breakers is that they are auto-mechanical. So, rather than replacing them each time, you can simply reset them with a switch.
Again, to calculate what size breaker you need, you’ll need to work out the total load going through the breaker at any given time.
Breakers come in various sizes; however, I like to use these on larger loads since they also work as an isolating switch.
On my campervan wiring diagram further down, you’ll see where we’ve installed our circuit breakers.

Switches
Switches aren’t exactly a safety device; however, they are useful if you want an energy-efficient system.
An obvious example is your lights. If you didn’t install a switch of some kind, they would be on all the time. That would quickly drain your batteries, not to mention keep you up at night.
The same goes for all other appliances. Even when they’re not in use, they can still draw precious power from your batteries.
Installing a switch on the live side of the circuit will allow you to shut off the power to that appliance.
If you have many appliances, you may benefit from a switch panel like this one that we have.
PV Array DP Isolator
A DP (double-pole) isolator is generally used for high power fixed wiring appliances in the home. It allows you to shut off both the live and neutral parts of the connection.
In this case, however, we will be using one for our solar panels. It will allow us to shut off both the positive and negative elements of the circuit.
The reason being is that all the time that there’s daylight, our solar panels will be generating electricity.
Should we ever want to work on our electrics, or when we aren’t using the van, it’s good to know that we can shut off that supply.
On our wiring diagram further down, you’ll see that we’ve installed a DP isolator in between our solar panels and the charge controller.

Consumer Unit
Most of you will be familiar with a consumer unit since they are commonly used in the home. You might know them as a fuse board or fuse box.
Its function is to control and distribute the electrical supply throughout your property. But most importantly, it’s there to protect your property from an electrical hazard.
If you are to install an AC electrical system in your van, you most certainly want to have a consumer unit.
Since we have two AC circuits in our van (1 double & 1 single plug socket), we fitted a 2-way consumer unit. Depending on how many AC circuits you plan on having, you might need a bigger one.
Step 6 - Connectors, Crimping, & Soldering
OK, we’ve figured out your cable and fuse sizing, so now we can look at how everything will connect together.
This part really baffled me, to begin with. There seem to be loads of tutorials of what wires go where, but nothing that demonstrates how they actually connect.
I apologise if any of this seems obvious; however, I figured some of you might be in the same boat I was and benefit from a quick explanation.
Throughout the campervan wiring process, you will need to make various connections such as:
- Connecting devices to your fuse block.
- Connecting wires to your batteries.
- Connecting wires to wires.
- Connecting devices to switches/circuit breakers etc.
There are many different ways of making an electrical connection, and it’s not a one size fits all. Ultimately, however, their purpose is to complete the circuit.
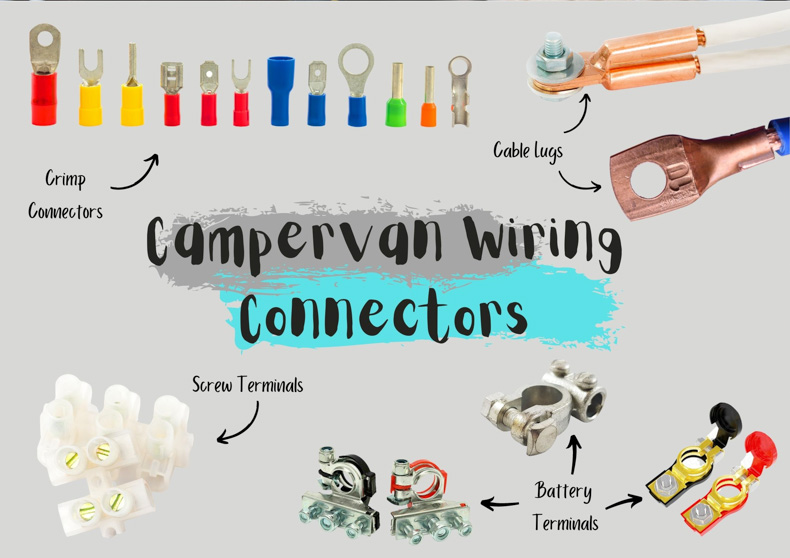
Crimp Connectors
The most common connectors you’ll use when wiring your campervan is crimp connectors. These connectors allow you to make sound electrical connections without the need for soldering.
Crimp connectors, sometimes called crimp terminals or cable lugs, come in various shapes & sizes. Which one you’ll need will depend on your wire size and the connection you’re trying to make.
For example, when attaching our heavy gauge cables to our battery terminals, we needed heavy-duty connectors to accommodate the thick wires.
We also needed a ring-type connector with a big enough hole to fit the conductors on our battery terminals.
Thankfully, when ordering any type of connector, it tells you what size wire and ring size they are fit for. So you can order your connectors at the same time as your cables.
Another example is when it came to fitting our water pump. The pump already had a short negative and positive wire attached; however, I needed to make it longer.
What I did, is I connected a 4-metre wire to the positive and a 4-metre wire to the negative. I did this by crimping a female spade connector on one of the wires and a male spade connector on the other.
These are just a couple of examples out of the dozens of crimp connections in our electrical setup. But once you understand the basic concept, you’ll be prepared for any instances that come your way.
How to Crimp
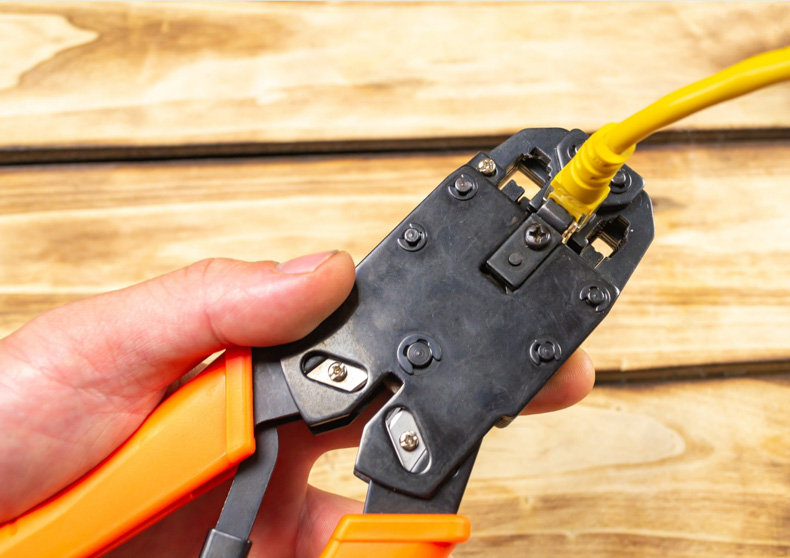
When done correctly, a crimp connection is robust. It should withstand the movement of your van with no issues at all.
To attach a crimp connector, the first step is to use a wire stripper to remove the insulation from the cable. You should remove just enough that you see very little exposed wire once inserted into the connector.
We use heat shrink to insulate any exposed wire that might remain. Pop the sleeve over the wire and the top of the crimp connector and use a heat gun to shrink it down.
The crimp connector is then compressed (crimped) around the wire with a crimping tool. For a visual tutorial, I highly recommend this video.
When crimping smaller wires, a standard crimping tool will suffice; however, you will need a hydraulic crimping tool for thicker wires.
If you only have a few heavy gauge cables and know the exact lengths they need to be, it might be worth buying them pre-crimped instead.
Soldering
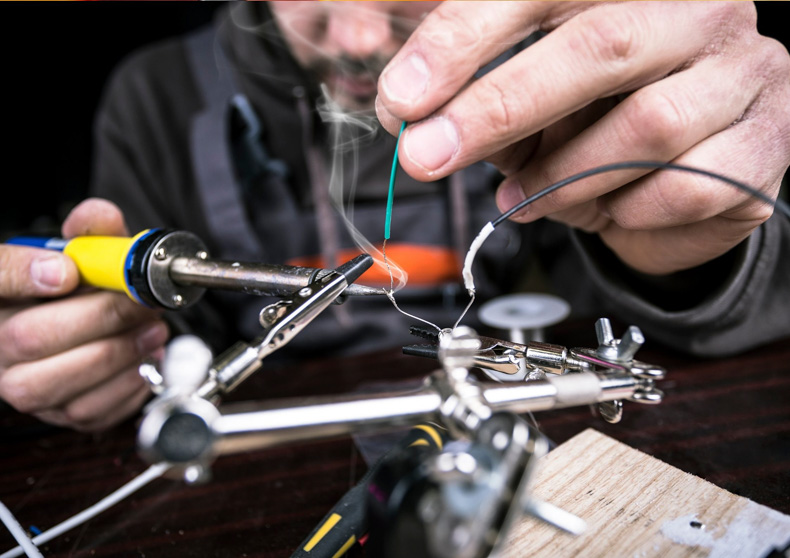
Soldering is another way of making electrical connections. It involves melting a low-temperature metal over a connection to secure 2 pieces together.
You can solder two wires together, or you can solder a wire to a crimp connector. This video shows you how to do both.
There are pros and cons for both crimped and soldered connections. Soldering certainly seems like the longer-lasting option; however, it could get messy if you’re not experienced.
Also, if you make a mistake, it’s much harder to undo a soldered connection than a crimped one.
For this reason, we avoided soldering altogether. But at the end of the day, it all comes down to what you feel most comfortable with.
MC4 Connector
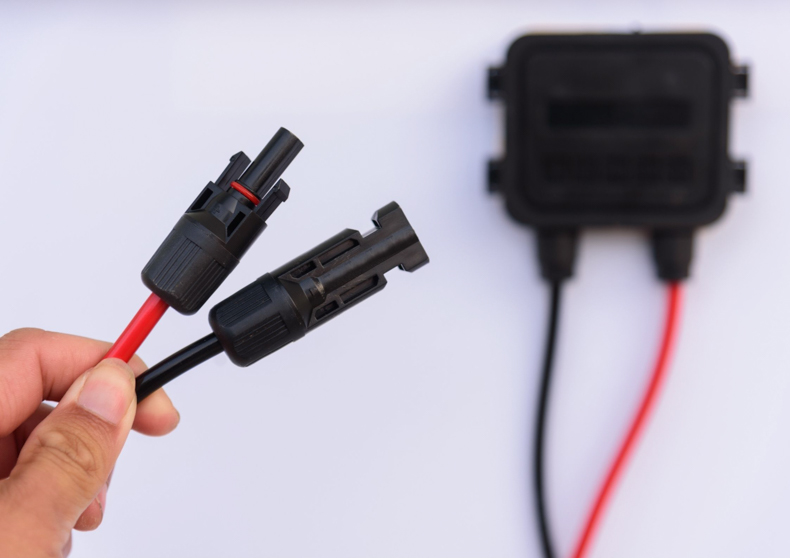
MC4 connectors are single-contact electrical connectors. They are most commonly used for connecting solar panels.
In most van builds with solar systems MC4 connectors are used. If you order specific PV cables they will generally come with MC4 connectors already equipped.
MC4 connectors are weatherproof and make solar panel installation a hell of a lot safer and easier.
Screw Terminals
Another type of connection you will encounter when wiring your campervan are screw terminals.
A screw terminal works by inserting a stripped wire into an insulated opening. You then tighten up the screw to secure the wire in place.
These connections are common in things like battery chargers, MPPT Charge Controllers, consumer units, etc.
Battery Terminals
Battery terminals are the electrical contacts used to connect a load to your batteries. Again, there are various types on the markets, but their purpose is the same.
Regardless of their shape, they usually require the same method of connection. Nuts and bolts are used to attach them to the battery and connect the loads.
Like I mentioned earlier, you will need to know what size bolts your battery terminals use so that you can buy suitable connectors.
Related Read

Step 7 - Earth or Grounding

Without getting too technical, earthing is the process of connecting electrical circuits to the earth. We do this because the earth, the ground on which we walk, has zero vault potential.
All standard household electrics are earthed. Should there ever be a fault in the system or if the house got struck by lightning, this earthing reduces the risk of electric shock.
There is much debate in camper van electrics as to whether or not you need a common earth or grounding point. Researching this point will take you down a long and dark rabbit hole.
I’m not an electrician, and I can’t tell you the definitive answer. However, I can tell you what we were advised, and you can do with that information as you like.
Since our DC system is low voltage (12 volts), we were advised that there was no real need to ground our leisure batteries. We were happy with that decision, although I know plenty of people who think otherwise.
On the other hand, it was advised that we should most certainly ground our AC (240v) electrics.
Since we are working with potentially lethal voltage, grounding minimises the risk of electric shock should a wire ever come loose and come into contact with the van.
Technically our hook up point should use the mains earth it is connected to. However, should there ever be a dodgy supply (not uncommon in some countries), having a grounding point in the van means we are still protected.
Based on the manufacturer’s guidelines, I also grounded our solar charge controller and inverter.
How do you earth electrics in a campervan?
Since the four rubber wheels insulate our campervan from true earth, we need to use the next biggest thing: the vehicle chassis.
Most vehicles have a pre-fitted grounding point, but it might not be in a convenient location, depending on your electrical setup.
I made a new grounding point to keep our cable runs short and tidy. It’s best to have your grounding point as close as possible to your garage.
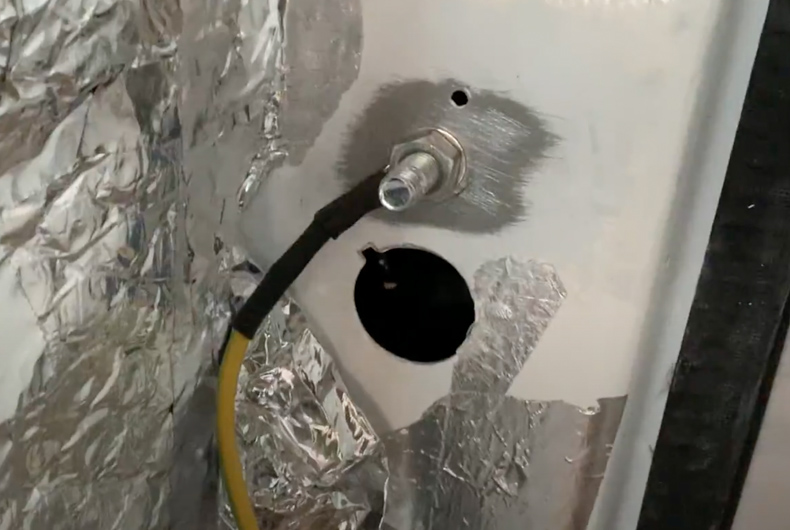
I did this by drilling a hole in the vehicle chassis (an area not exposed to the outside). I then used sandpaper to sand off the paint and used a nut and bolt to secure the earth wires as per the photo above.
Step 8 - Campervan Wiring Diagram

Hopefully, by now, you’ve got an idea of how to go about your campervan wiring. Well done for sticking with me, as I know it’s been a lot to take in.
Before you go about ordering wires, connectors, fuses, and the like, it’s wise to produce a campervan wiring diagram like the one you see above.
This allows you to plan out each of the circuits on your system. It will help you identify what size cables you need, your fuses/breakers, and will act as a guideline for when it comes to doing the wiring itself.
This step really helped me get my head around what my campervan electrical system would look like. It seemed far less daunting once I could look at it on paper and make a plan.
Don’t hesitate to reach out should you need any help putting together your own diagram.
Update Your Van Insurance!
Have you chosen the right van insurance? We could have saved nearly £400 if we had told our insurers our van was no longer a working van and, in fact, being converted! Make sure you compare online using the button below.
Step 9 - How to Wire Your Campervan Step by Step
OK, now it’s time to put everything into practice and start installing your campervan’s electrical system.
Here’s a step by step process that I recommend you follow to ensure a safe and smooth setup. This assumes you’ve covered all of the steps outlined in the article so far.
Pre-Installation Checklist
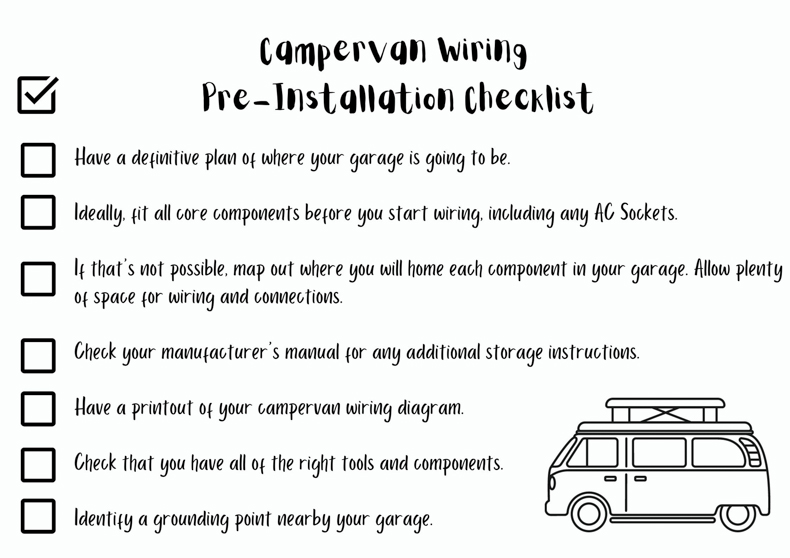
- Have a definitive plan of where your garage is going to be.
- Ideally, fit all core components before you start wiring, including any AC Sockets.
- If that’s not possible, map out where you will home each component in your garage. Allow plenty of space for wiring and connections.
- Check your manufacturer’s manual for any additional storage instructions.
- Have a printout of your campervan wiring diagram.
- Check that you have all of the right tools and components.
- Identify a grounding point nearby your garage.
Installing your AC (240v) System Step by Step
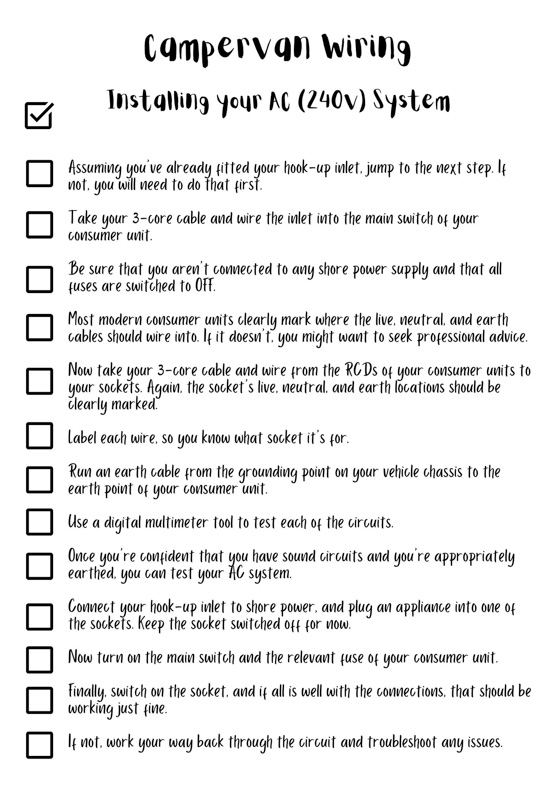
- Assuming you’ve already fitted your hook-up inlet, jump to the next step. If not, see this video on how to get it done.
- Take your 3-core cable and wire the inlet into the main switch of your consumer unit.
- Be sure that you aren’t connected to any shore power supply and that all fuses are switched to OFF.
- Most modern consumer units clearly mark where the live, neutral, and earth cables should wire into. If it doesn’t, you might want to seek professional advice.
- Now take your 3-core cable and wire from the RCDs of your consumer units to your sockets. Again, the socket’s live, neutral, and earth locations should be clearly marked.
- Label each wire, so you know what socket it’s for.
- Run an earth cable from the grounding point on your vehicle chassis to the earth point of your consumer unit.
- Use a digital multimeter tool to test each of the circuits. If you’re unsure, see this video on using a multimeter.
- Once you’re confident that you have sound circuits and you’re appropriately earthed, you can test your AC system.
- Connect your hook-up inlet to shore power, and plug an appliance into one of the sockets. Keep the socket switched off for now.
- Now turn on the main switch and the relevant RCD of your consumer unit.
- Finally, switch on the socket, and if all is well with the connections, that should be working just fine.
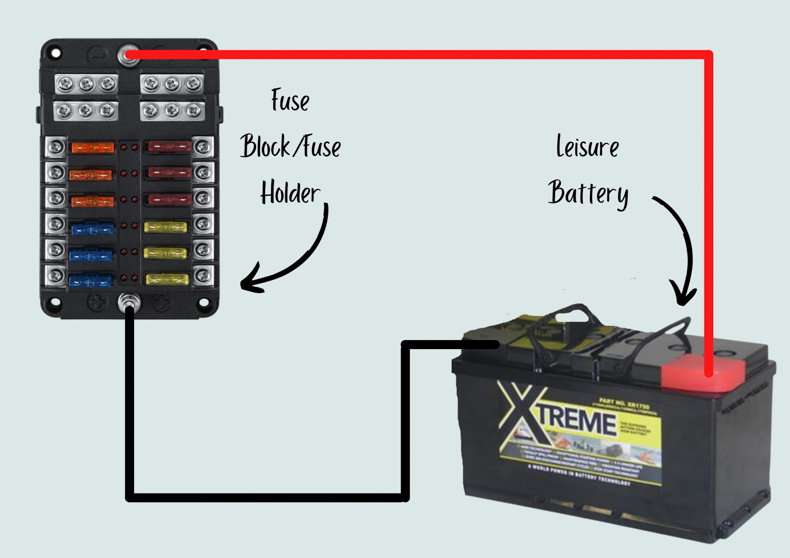
Installing your Leisure Batteries Step by Step
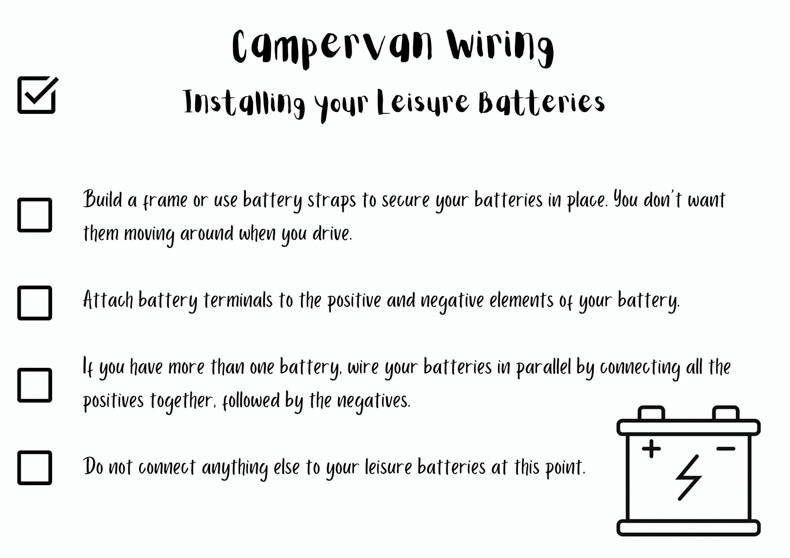
- Build a frame or use battery straps to secure your batteries in place. You don’t want them moving around when you drive.
- Attach battery terminals to the positive and negative elements of your battery.
- If you have more than one battery, wire your batteries in parallel by connecting all the positives together, followed by the negatives.
- Do not connect anything else to your leisure batteries at this point.
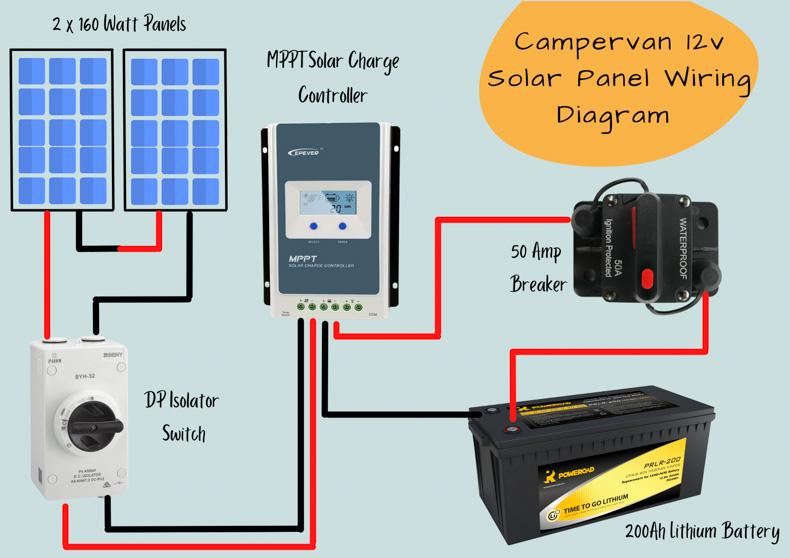
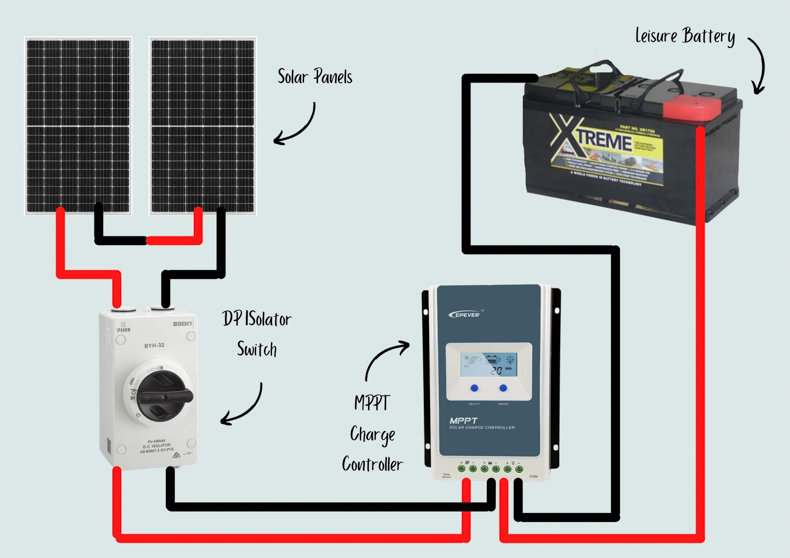
Installing Your Solar Panels Step by Step
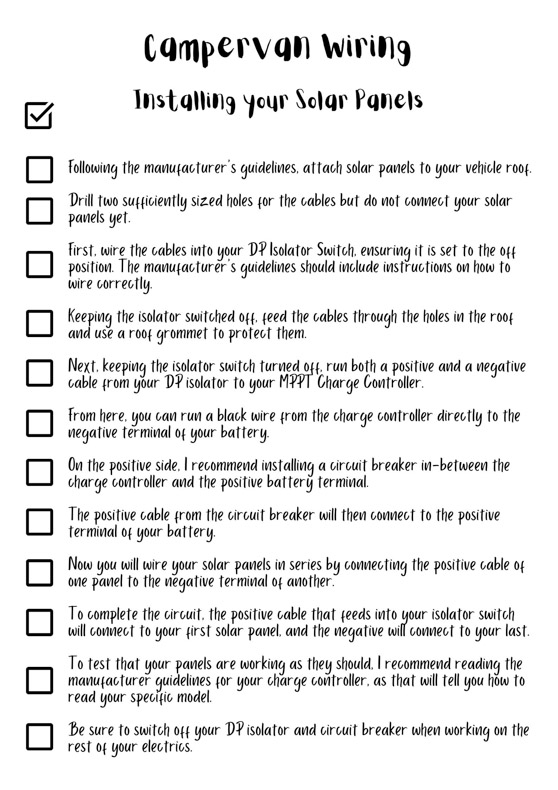
- Following the manufacturer’s guidelines, attach solar panels to your vehicle roof.
- Drill two sufficiently sized holes for the cables but do not connect your solar panels yet.
- First, wire the cables into your DP Isolator Switch, ensuring it is set to the off position. The manufacturer’s guidelines should include instructions on how to wire correctly.
- Keeping the isolator switched off, feed the cables through the holes in the roof and use a roof grommet to protect them.
- Next, keeping the isolator switch turned off, run both a positive and a negative cable from your DP isolator to your MPPT Charge Controller.
- From here, you can run a black wire from the charge controller directly to the negative terminal of your battery.
- On the positive side, I recommend installing a circuit breaker in-between the charge controller and the positive battery terminal.
- The positive cable from the circuit breaker will then connect to the positive terminal of your battery.
- Now you will wire your solar panels in series by connecting the positive cable of one panel to the negative terminal of another.
- To complete the circuit, the positive cable that feeds into your isolator switch will connect to your first solar panel, and the negative will connect to your last.
- To test that your panels are working as they should, I recommend reading the manufacturer guidelines for your charge controller, as that will tell you how to read your specific model.
- Be sure to switch off your DP isolator and circuit breaker when working on the rest of your electrics.
Installing your 12v system Step by Step
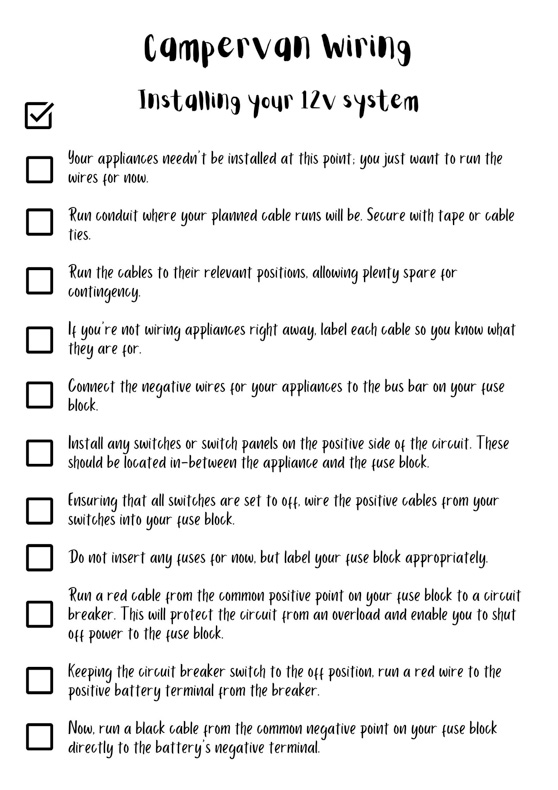
- Your appliances needn’t be installed at this point; you just want to run the wires for now.
- Run conduit where your planned cable runs will be. Secure with tape or cable ties.
- Run the cables to their relevant positions, allowing plenty spare for contingency.
- If you’re not wiring appliances right away, label each cable so you know what they are for.
- Connect the negative wires for your appliances to the bus bar on your fuse block.
- Install any switches or switch panels on the positive side of the circuit. These should be located in-between the appliance and the fuse block.
- Ensuring that all switches are set to off, wire the positive cable from your switches into your fuse block.
- If you’re installing a switch panel, watch this video on properly installing one.
- Do not insert any fuses for now, but label your fuse block using these handy stickers.
- Run a red cable from the common positive point on your fuse block to a circuit breaker. This will protect the circuit from an overload and enable you to shut off power to the fuse block.
- Keeping the circuit breaker switch to the off position, run a red wire to the positive battery terminal from the breaker.
- Now, run a black cable from the common negative point on your fuse block directly to the battery’s negative terminal.
Testing your 12v system Step by Step

- Before testing anything, cross-check your wiring and connections.
- Be sure that there are no exposed copper wires anywhere and that the positives and negatives are wired correctly.
- Check that all of your connections are tight, using a spanner or screwdriver where required.
- Use a multimeter to check each of the circuits in your system.
- Ensuring that all switches and breakers are off, and assuming your appliances are fitted and wired, insert the relevant fuses into the fuse block.
- Now, connect any relevant circuit breakers and switch on your appliances one at a time.
- Check that each appliance is working as it should and be aware of any suspicious noises or smells.
- If you feel something isn’t quite right, turn everything off and troubleshoot the problem.
- If everything is fine, test each individual appliance one at a time.
- Once you’re confident everything is safe and working ok, you can test all of your appliances simultaneously.
- Finally, celebrate! You’ve just achieved something pretty damn impressive. Time to put your feet up and enjoy a well-deserved beer!
Step 10 - Final Campervan Wiring Tips & Advice
Wow, I don’t know about you, but I am absolutely exhausted after all that.
It was my intention to keep this article as short and sweet as possible. But unfortunately, when it comes to electrics, there’s not much room for cutting corners.
Anyway, we are almost there. I just have some final tips and advice to help you on your campervan wiring journey, and then class, you are dismissed.
Thanks again for sticking with me, and I truly hope I’ve made this mammoth job slightly less intimidating for you.
- I completed a lot of our own electrical system based on the advice of Greg Virgoe. His YouTube tutorials are without doubt the best I’ve come across, so I highly recommend you check him out as well.
- I cannot reiterate enough that I am by no means a qualified electrician. I can only guide you based on my own experience and cannot be responsible for your own installation.
- If at all in doubt about wiring your electrical system, seek professional guidance.
- At the very least, have your system checked over by a professional to ensure it complies with industry standards.
- While I’ve tried to cover as much as I can in this article, I have no doubt that you’ll hit a roadblock at times. If you can’t find what you’re looking for on our blog, a quick google search should help you find the information you need.
- At the same time, try to avoid getting sucked down the rabbit hole of seeking answers on the internet. Everybody has an opinion, and everyone does things in different ways.
Related Read


Good Luck Wiring your Campervan!
So there you have it. A step by step guide on wiring your campervan electrics. I hope that you’ve found it helpful.
If you have any questions or feedback, feel free to reach out to us in the comments. Or drop us a message – we are always happy to help.
Good Luck!

For more help with your campervan conversion, check out our van build series.

PIN IT FOR LATER

Sharing is caring ♥


8 Responses
You rock! Thank you for making the whole process less daunting.
Nice one Matt – Glad the article was helpful!
Hi Charlotte and Natalie Thanks for writing this. You explain things really well and gave just the right amount of information. Much appreciated.
Hi Graham! I’m so glad you found the article helpful … let us know if you have any other questions!
Hi,
Good you put tutorial for wiring. working on this day and night, yet I am stuck with wiring sizing, didn’t get how you used table, maybe iam too tired, but r example with water pump
Example 1
Our Shurflo 12v Water Pump has a current rating of 4.5 amps.
Since it’s located towards the front of the van, we had to use around 4 metres of cable.
It’s enclosed in conduit but not behind an insulated wall
Therefore, if we refer to the table above, a 2.5mm2/14 AWG sized cable is plenty big enough.
I probably don’t understand table itself -> 4.5 amps in conduit then if use google – 16 gauge wire can carry 8 apms continous or 10apms someone said, so how did you choose it? stack with it, i got appliance, scheme in my head, just need do wiring sizing and order
I got totally engrossed in this – thank you so much! I know a bit about vehicle electrics as I’m about to embark on van 2 but I had a lot of help from my stepdad first time round. This time I feel I can go solo thanks to your great blogs (really well paced) – and yes I was nervous about it until I read them.
Take care!
Hello Dan, thank you for this huge compliment! It’s comments like this that make the time putting this blog together all worth it so thank you so much and good luck with the build!
Loving how you put all the information together in a digestible way with all the supporting info, jargon and pictures. Thanks!
Just wondering if there is an error on the diagrams.
On the Section “Fuse Block to Battery Cable Sizing”, there is a diagram and the positive wire is going to the top. If you look closely, you can see a “-” sign on the Fuse block. I notice this is the opposite way round (wired correctly) in your picture of your actual installation, however, in the full schematic “Campervan 12v Wiring Diagram” it’s also wrong. This means that the cables from the battery labeled “10mm” also need correcting.
Am I totally wrong here?
Thanks and keep up the amazing work.