
If you’re looking to convert a ford transit into a campervan, this is the perfect article for you. This guide walks you through our own ford transit campervan conversion from start to finish. So that by the end, you can go ahead and build the perfect DIY camper for yourself!
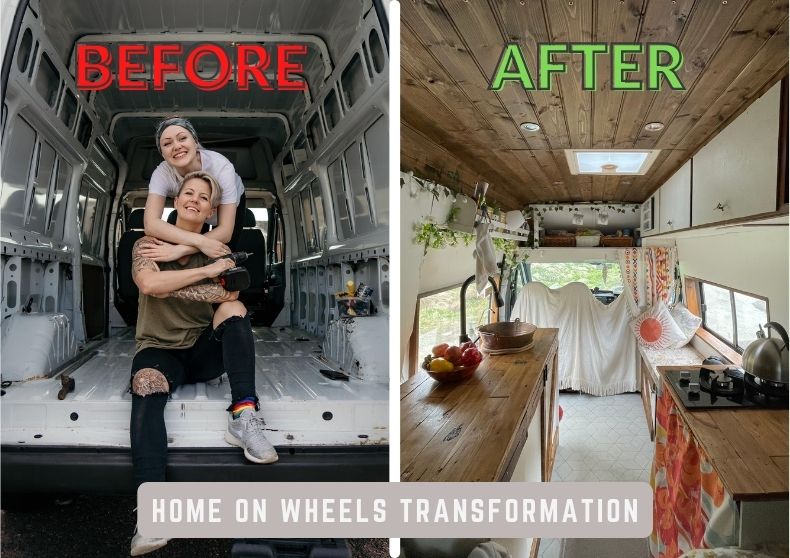
It’s been a little over a year since we started converting our ford transit van into a campervan. And I’m happy to say that Ventura (our van) is 98% complete.
With no experience in DIY, electrics, plumbing, or anything else that comes with converting a camper, to say it’s been a challenge is an understatement.
Nonetheless, with perseverance, patience, and sheer determination, we’ve been able to manifest our dream into reality. It’s an achievement we are incredibly proud of.
If we can do it, you can do it too! In this guide, we will show you how. Starting at the initial stages of prepping and insulating, right through to the finishing touches.
We’ve been on many adventures with Ventura at different stages of the build. So we have the advantage of knowing what works and what doesn’t.
We don’t claim to be experts – far from it. But hopefully, you can learn from both our triumphs and our mistakes to create your very own dream home on wheels.
So let’s get to it. Here’s a step by step guide on converting a ford transit van to a campervan.

Jump to…
Disclosure: Some of the links in this post are affiliate links. If you purchase a product through these links, we will earn a small commission at no extra cost to you. And we can continue bringing you free tips and advice. If you found the content helpful and are kind enough to use our affiliates – you are awesome, and we thank you!
Our Own Transit
Camper Conversion Journey
#Vanlife. It’s all the rage these days. Campervan conversions are at an all-time high, with anybody selling a van cashing in on the demand.
Honestly, we’ve always dreamt of converting a campervan. So when the pandemic hit, it seemed like the perfect time to jump on the bandwagon.
They said that backpacking the world together would be the biggest test of our relationship. But after converting a van, I’m not so sure!
Anyway, one of our biggest priorities was to convert our camper on a budget and to use recycled material wherever possible. We also got by without any fancy tools – a drill and a jigsaw were our two best friends!
Most importantly, we needed facilities that would allow us to work on the road.
Perhaps we could have saved ourselves a lot of hassle and time if we hadn’t had those priorities. So do keep that in mind when you’re planning your own build.
Regardless of your budget or timeframe, you’re sure to benefit from the information we share in this guide.
Watch Our
Van Tour Vlog
Ford Transit Campervan Conversion
Step by Step
Here we will cover everything we think you need to know about converting a van to a campervan.
We have information on sound deadening, insulation, ventilation, cooking facilities, furniture, electrics, storage, accessories and more!

Step 1: Choosing the right van for you
You might already have your van, in which case you can jump to step 2. However, if you’re yet to buy a van to convert, there are a few things you’ll want to consider:
- Do you want to be able to stand up in your camper van? You’ll need to think about getting a van with a high roof if you do.
- Do you want to have living space/cooking facilities inside the van? If so, you’ll need something bigger than, say, a ford transit connect.
- Will you be travelling alone or with your partner or pets? The more space, the better; it can get cramped and cluttered very quickly.
- Do you want your bed to be widthways or lengthways? If you wish to utilise the space and position your bed widthways, you’ll want to make sure it’s a width you’ll be comfortable with.
You must choose the van to suit your needs. There is no point going to all this effort if your van isn’t going to be comfortable.

Ventura (our van) is a Ford Transit MK7 with a high roof and long wheelbase. Having a high roof means we can stand up straight even with insulation, flooring, cladding, etc.
The fact it’s a long-wheelbase also means we have more space, allowing us plenty of storage, a seating area, a dining table, and even a mini bathroom.
Particularly if you’re planning on full-time van life, comfort is vital. Small things like being able to stand up straight or stretch out in bed do make all the difference.
Step 2: Strip, Clean & Prep Your Van
Unless you bought your van brand new, chances are it will need some TLC before you start your build.
You want a clean, clear and smooth shell to work with, so you can accurately measure the space and start with a blank canvas.
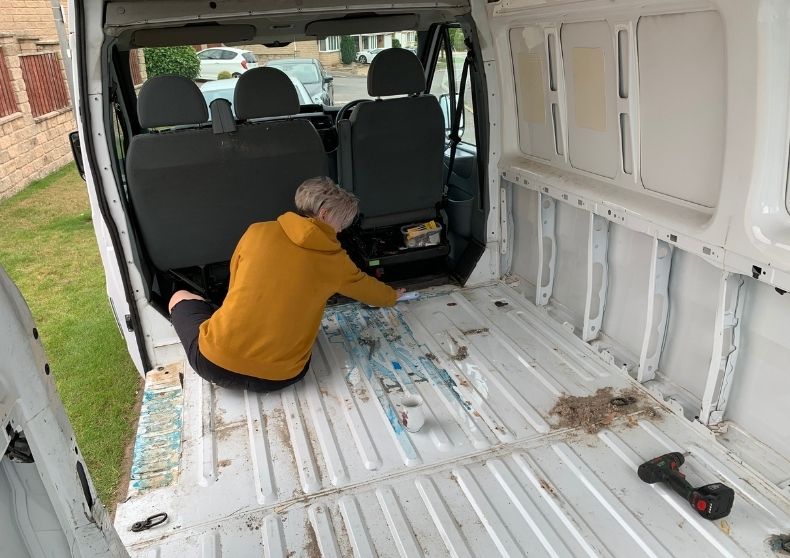
For example, our van had ply all over the walls and flooring that needed removing. Plus, there were over 80 screw holes in the floor that needed cleaning, painting and filling.
We also decided to remove the bulkhead from our ford transit van to give us more space and let more light in. This was a smart move as we later sold it for £70.
Some of the things you might need to do include but are not limited to:
- Removing any existing ply, carpet, or other coverings on the van walls.
- Remove any unnecessary bolts or screws.
- Remove any small rust spots using a metal wire brush. If you discover a lot of rust, you might need to take your van to a professional welder.
- Take out the bulkhead that separates the cab from the back.
- Give everywhere a good clean.
- Sweep out any dust and debris.
- Clean all the surfaces with a non-water-based product, like a nail varnish remover high in acetone.
- Paint any rust areas using a rust prevention paint – we used Hammerite straight to rust.
- Fill in any holes or cracks exposed to the outside – we used steel putty.
At this stage, it’s also a good time to check if your van has any leaks. You can wait until it rains or run a water hose over the van. Keep an eye out for any water coming through.
Shop Rust Paint
Shop Steel Putty
Shop Wire Brush
Step 3: Plan your Ford Transit Camper Layout
Before you go any further, you need to have an idea of what your final van layout will look like.
I honestly can’t stress this point enough since it’s something we failed to do in the early stages and paid for later down the line.
Of course, we got around it and made things work. But it would have saved us some time and headache had we planned things more thoroughly in the beginning.
First, you’ll want to take measurements of the inside of your van, including the height, width and length. This will tell you the space that you have to work with.
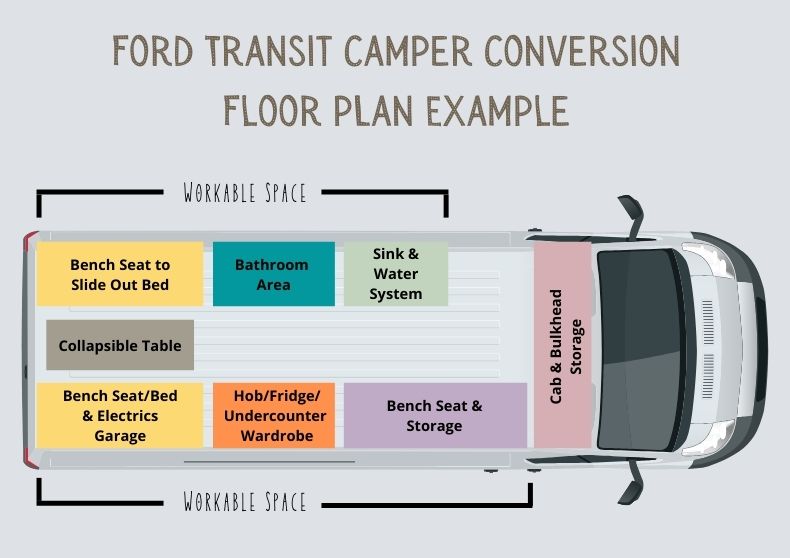
Create a Floor Plan
When you have that, you can start drawing out your floor plan. You can do this using some fancy software, or you can do it the good old-fashioned way using pencil & paper.
If you want to meet somewhere in the middle, you can design your ford transit campervan floor plan for free using a drawing software like adobe illustrator.
The idea is to work out where everything will be located and how much space it will take up. You can see the example above to see what I mean.
If there are things that you just aren’t sure of at this stage, do not stress. This is just a rough plan.
Until you start insulating (step 8) and creating your framework (step 7), you won’t accurately know the final space and dimensions that you have to work with.
Our final layout changed countless times due to hiccups we encountered along the way. Unless you’re a pro with lots of previous experience converting vans, this is inevitable.
But so long as you have a rough idea of your layout. And you’re open to changing course when you need to; there is always a way around the bumps in the road.
Things to Consider
Planning out the space is one thing, but there are other things to consider when doing your floor plan. Some for safety and others for convenience.
Installing Windows
If you’re fitting campervan windows and your DIY ford transit camper is anything like ours, you might find they are positioned quite low down.
We wanted to avoid having anything blocking the side windows to maximise sunlight. So that meant our initial plans for an indoor shower were scuppered.
Now we have an outdoor shower instead and a bench seat where we intended the indoor shower to be.
For the back windows, it meant that the bed and bench seats couldn’t be too high up. Otherwise, we wouldn’t have been able to see out of the back windows.
Your Vans Usage
Another thing to consider is how much time you’ll spend in your van.
If you’re planning on spending extended periods in your van, you’re likely to need a lot more features than someone who only uses their van at weekends.
Things like cooking facilities, running water, a fridge, and the bed, are all relative to how comfortable you feel you need to be.

Electrics
I don’t want to overwhelm you, but now is also a good time to plan your campervans electrics.
You don’t need to know precisely what you’re doing at this stage. However, you do want to know where your garage will be. (This is where you store all of your electrics).
Our garage is at the back of the van in a ventilated bench seat. This is also the bottom of our bed where our feet lie.
You want to keep your garage away from any water supply for obvious reasons.
You’ll also want to think about your cable runs and if you want them running behind your walls or insulation. We talk more about that in this guide to wiring your campervan.
Related Read

Gas Drop Out
If you plan on keeping any gas in your van for cooking, heating, or whatever, regulations state that you need a drop out beneath the canister.
So when planning where to house your gas locker, make sure it’s an area where you can put a hole in the floor.
If you know for sure you won’t want to change its location later, it’s worth getting this job done ASAP.
Step 4: Windows & Ventilation
Now we’ve come to the first hands-on DIY job you will do on your van. Which is somewhat unfortunate since it’s also one of the most daunting.
Naturally, putting holes in your van is a scary prospect. But it’s necessary if you want a nice bright van that’s properly ventilated. Nobody wants a dark, dingy and smelly van!
Bonded Windows
It was important to us to have a lot of light in our camper, so we bought two side and two rear windows. One side window slides open for extra ventilation when cooking.
We chose to go with bonded glass windows since this was the cheaper alternative to plastic caravan windows.
I admit that installing these windows was not an easy task, especially in winter. I can see why a lot of people choose to outsource the work.
However, for those brave enough to give it a go, you can check out this video on how to fit campervan bonded windows and save yourself a few hundred quid.
For UK based builds, we recommend Van Demon for purchasing Ford Transit Campervan Windows.
Ventilation
For ventilation, we decided to go with a Fiamma Sky Light Vent. At the time, it seemed like the best budget option compared to other roof ventilation options.
However, after having a few trips away in Ventura, we realised that a vent alone wasn’t working, and we got a lot of condensation in colder temperatures.
Knowing what we know now, we would have spent the extra £150 to have an electric roof fan instead.
It’s something we might still do eventually. But since it wasn’t an easy job fitting the skylight vent, we aren’t in too much of a hurry.
In the meantime, thanks to a fantastic hack by Tattooed CamperDan on YouTube, we’ve installed a DIY extractor fan on our rear door with a cowl to protect the vent hole from rain and wind.
It does a reasonably good job of ventilating the space, and we’ve minimised our condensation issue. It’s also a superb budget alternative as the fan is intended for a PC or PlayStation.
We also purchased rain guards for our driver and passenger windows to maximise airflow. This lets us discreetly keep the windows down a few centimetres without any rain coming in.
Shop Roof Fan
Shop Extractor Fan
Shop Roof Vent
Step 5: Sound Deadening
We are often asked if it’s worth sound deadening a campervan, and I’m here to tell you that yes. It is absolutely worth sound deadening your vehicle.
We couldn’t believe the difference after adding soundproofing material to the van body. Immediately reducing that dreadful road noise that’s common in working vans.
It’s continued to flaunt its benefits ever since, allowing us a peaceful night’s sleep in any scenario. Even when we took the van to a noisy music festival – good times!
We actually did this step before installing our windows. But in hindsight, we should have done it after, as we wasted some material. No big deal, but keep it in mind.
Out of all the jobs converting our ford transit to a camper, this was the easiest one to do. Although it did take half the day to cover our high top long wheelbase.
There are various materials you can use to soundproof your campervan. We used Dodo Mat DEADN Hex Roll.
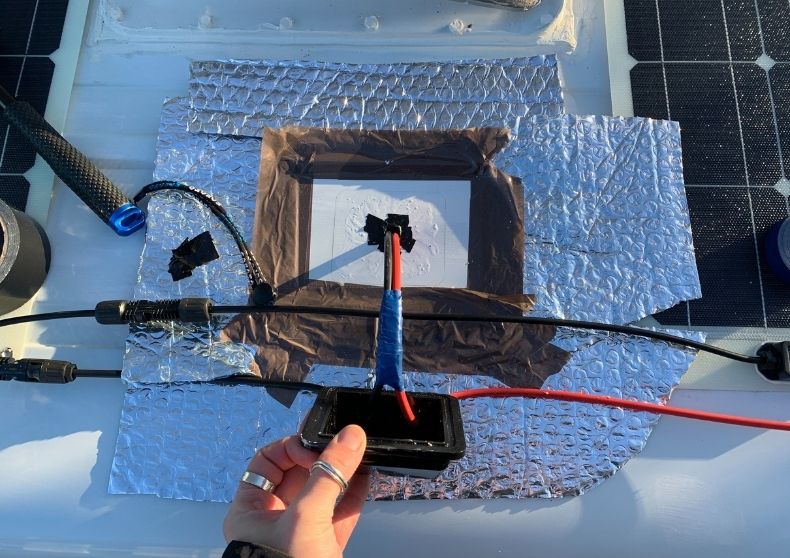
Step 6: Installing Solar Panels & Shore Power Hook-Up Inlet
If you want to have power in your van, the chances are you will want to install solar panels or a shore power electric hook up.
Solar panels will allow you to top up your leisure batteries whenever there is sunlight.
While an electric hook up means you have to plug in at campsites or wherever there is mains power.
It might seem a little soon to be thinking about electrics, but both of these features involve making holes in the van. So you’ll want to prepare before you’ve insulated.
This beginner’s guide to campervan electrics explains everything you need to know about planning your electrical setup.
For now, let’s assume that you’ll have both features in your van. We have both, and in most circumstances, we would recommend that you do the same.
Even if you plan on spending most of your time off-grid, several factors can influence the efficiency of solar panels. Having an electric hook-up is a good backup.
Of course, neither of these jobs is straightforwards. So be sure to check out our detailed guides to help you through them.
Shop Solar Panels
Shop Solar Charge Controller
Shop HookUp Inlet
Step 7: Creating the Framework
Now it’s time to get your framework into place. This part is especially important since every permanent feature moving forwards will need to attach to this frame.
With that in mind, you need to be strategic about where and how you place your framework.
Think about where you will want any walls, counters, cupboards, the bed etc., to be supported. Make sure there is sufficient framework in place for you to drill into.
Once your framework is complete, you might want to look at your floor plan and note where you’ve placed your batons since this may change your layout slightly.
We will run through our process to help give you an idea, but your framework may need to be different depending on your van layout.
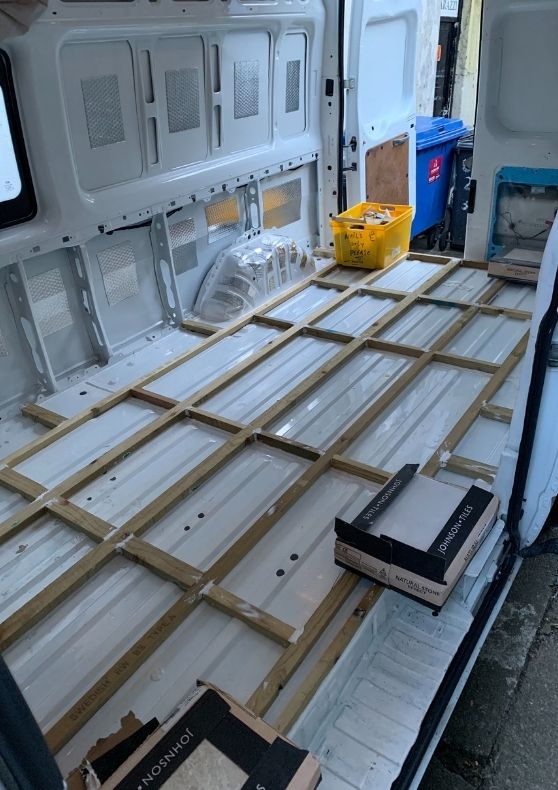
Floor Frame
For the flooring, we used 25mm timber batons. We had 5 rods running lengthways and then measured shorter batons to fill the gaps widthways.
Then we glued the batons to the van floor using Sikaflex, weighed them down with heavy weights and left them to set overnight.
We decided not to screw the batons down, as this would mean piercing through the van’s body.
Since any exposure to the outside can lead to potential rust issues, we agreed that Sikaflex glue is more than enough for the floor.
Related Read

Wall Frame
Next up was the wall frame, and we used the same sized batons as we did for the floor.
We decided to run batons horizontally along the inner skin of the van’s body. We did this so that when we secured them, we wouldn’t drill through to the outside of the van.
As I mentioned earlier, we had to strategically place them at the right height for all of our other furniture to build on.
We then took thicker wooden batons and stacked them horizontally along the bottom half of the van to allow extra support for our bed, cupboards, bench seats etc.
In hindsight, I should have put some batons vertically at the top as well. As it would have made fitting our overhead storage a lot easier.
Nonetheless, we added a bead of Sikaflex glue to the back of the batons, and then we screwed them to the inner skin using self-drilling wood to metal screws.
By adding a screw every 20cm along the baton, they were entirely robust. You could hang off of them, and they wouldn’t come loose. Not that we tried!
Basically, you need to make sure that your framework is indestructible. As if that comes loose, so does the rest of the build.
Ceiling Frame
Finally, the ceiling frame. For this, we used 12mm strips of ply that covered the 5 inner skin areas of the van roof.
The reason for choosing 12mm ply is because it was flexible enough to bend with the curve of the van roof but thick enough to use 10mm screws to secure our cladding.
We also wanted to lose as little height as possible since it was favourable that we could stand up straight in our van.
Tip – We spent a lot of time learning about cold bridging for this stage. To avoid this issue, you’ll need to use thick enough batons for your framework. So when it comes to attaching anything, the screws end in the wood and not on the van metal.
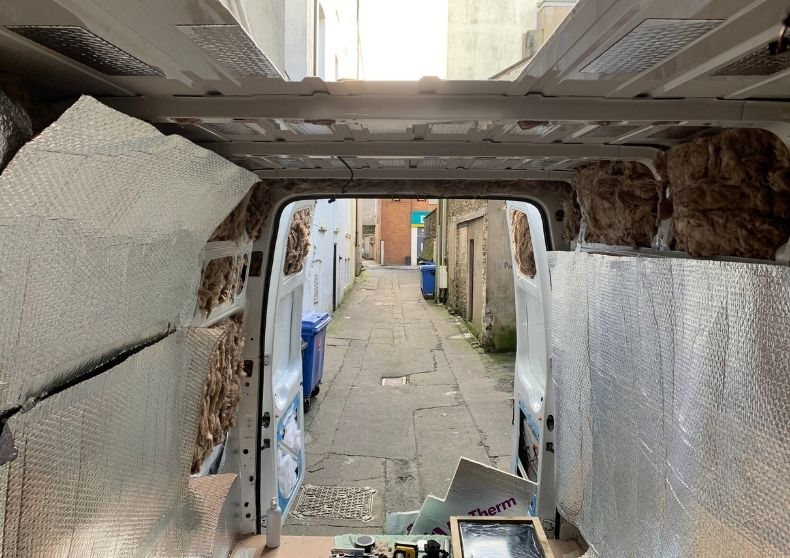
Step 8: Insulation
Choosing suitable insulation for your ford transit camper van conversion is one of the most critical steps of the entire build.
Your insulation material and how you apply it can make all the difference in extreme weather conditions.
Insulation slows the rate of heat transfer in and out of your van. When done correctly, it will be easier to keep your van warm in the winter and cool during the summer.
There are tons of options when it comes to insulating your campervan. And, naturally, everybody has an opinion on the right way of doing things.
In simple terms, every insulation material has an R-value. This is basically a measure of its thermal resistance, so the higher the R-value, the better the insulation.
I’ve included a link above to a helpful article about campervan insulation, so I recommend you check that out to help with your decision making.

What we Used
We have a combination of Celotex Boards and Knauff Eco Roll in our van. We used the Celotex for our floor and ceiling and the Knauff for our walls and cavities.
Both are affordable options if you’re like us and working on a budget. Plus, they both have relatively fair R-values and have kept us comfortable until now.
However, knowing what we know now, we wouldn’t use the Knauff Eco Roll again. While it is an eco-friendly, non-hygroscopic, glass wool material, it’s still essentially fibreglass.
Generally, fibreglass isn’t ideal for van builds since it’s prone to soak up moisture. Not to mention the ongoing debate over its impact on health.
While Knauff insists that their eco glass wool insulation products pose no risk to human health or the environment, we didn’t find it very pleasant to work with.
Any fibreglass material can cause irritation to the skin, so gloves are a must. So is a mask since you don’t want to be breathing it in.
Thankfully, it’s all sealed behind our vapour barrier now, so we aren’t too concerned about floating particles.
But looking back, we do wish we hadn’t been so naive at the time of buying. Instead, we would have opted for sheep’s wool that’s a higher R-value and non-toxic material. You live, and you learn!
Shop Sheep Wool
Shop Vapour Barrier
Shop Aluminium Tape
Step 9: Vapour Barrier
The next step of our ford transit camper conversion journey was to vapour barrier.
So what is a vapour barrier? Without getting too technical, it’s a sheet of material that prevents moisture from getting into your insulation.
When we cook and breathe in our van, it releases moisture into the air. Hence why we get a build-up of condensation in our van.
Even with the best ventilation systems in place, there is still a risk of moisture getting to your van walls.
If this happens, it can lead to rot and rust, which of course, you don’t want. Having a vapour barrier can help prevent this.
Having said that, some will argue that it’s better to allow your insulation to breathe. It’s just another one of those things where there is a difference in opinion.
In our minds, it seemed to make more sense to have a vapour barrier than to not. But of course, you can do your own research and see what you’re most comfortable with.
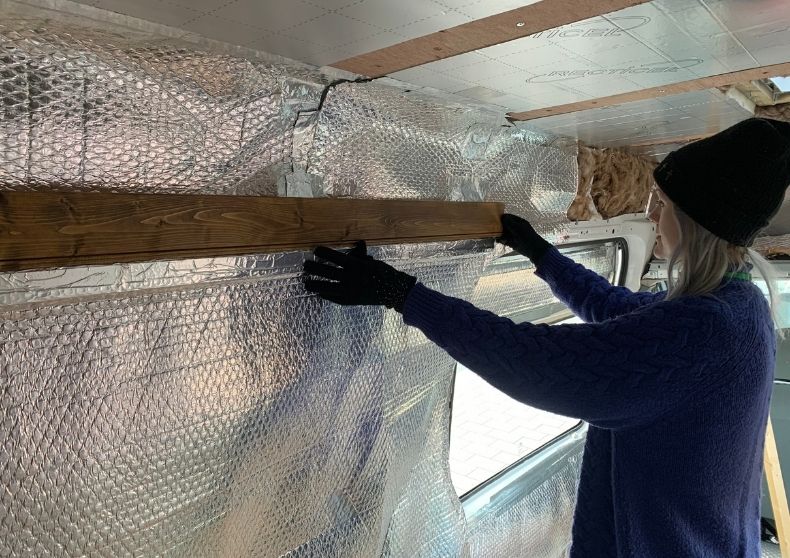
Installing our Vapour Barrier
We used Reflectix Double Insulation 25 x 1.2m to vapour barrier our campervan, with aluminium tape to hold it together.
The idea is to have a vapour barrier that goes all the way around the interior of your van. Concealing every piece of timber and insulation to seal the barrier.
Seems simple on paper. But of all the headaches of the van build, this was one that continuously came back to haunt us.
Since this part is done early on in the build, we’d puncture the barrier when working on other jobs. Using foil tape to doctor holes became an everyday occurrence.
You’ll also find that you’ll have to screw through the barrier when securing furniture to your frames. But that’s OK since the screw works as a seal.
Tip – Using a marker pen, mark the vapour barrier where any existing screws are. Since you won’t be able to see them, it will make things easier when drilling on your walls and furniture.
Step 10 – Flooring & Ceiling
Now we’re getting somewhere. The previous jobs can feel tedious and like you’re not making progress. Whereas now’s the time when you start to see things take shape.

Flooring
First, you’ll want to get your flooring down. Then you can move around freely without walking on tightropes (your floor batons) and worrying about the vapour barrier.
Our van came kitted out with 6mm thick sheets of ply on the walls and the floor. To save cash and time, it made sense to reuse it where possible, so that’s what we did.
For the flooring, it was almost perfect. There were a few holes which we filled later on. But It was already cut to fit, so we gave it a good sand down, and it was ready to use.
There was no need to paint it as we knew we’d be laying vinyl later on.
From there, we drilled the ply directly into our floor batons. We used screws long enough to get a good bite on the frame but were careful that they wouldn’t hit the van’s body.
The tricky part was ensuring we didn’t hit the screws already in the framework. But thankfully, we’d marked them, so we had a rough idea and managed to avoid them.
We later laid some cool geometric vinyl flooring. However, we left it until as late as we could get away with so it wouldn’t get marked or dented during the build.
Tip: If you plan on securing any furniture to your floor’s framework, be sure to mark where the batons are when installing your flooring. Most people use thick enough ply so that they don’t need to worry about this; however, since our ply was only 6mm it was a necessity for us.
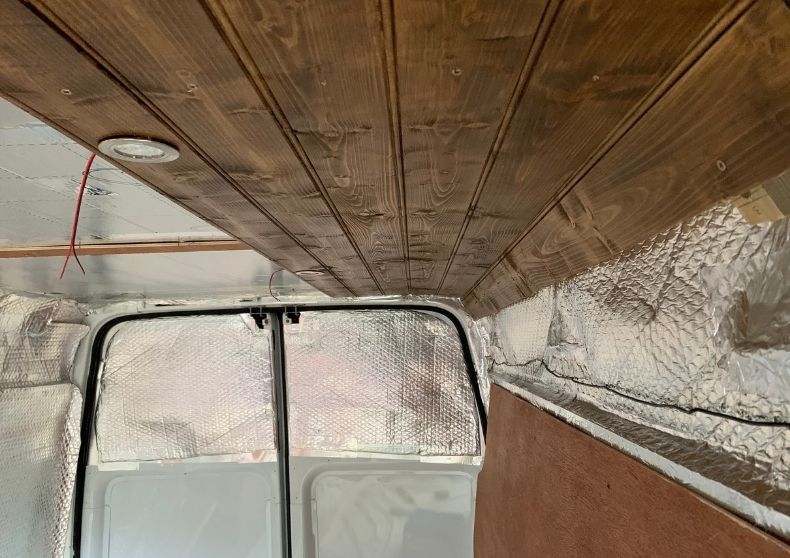
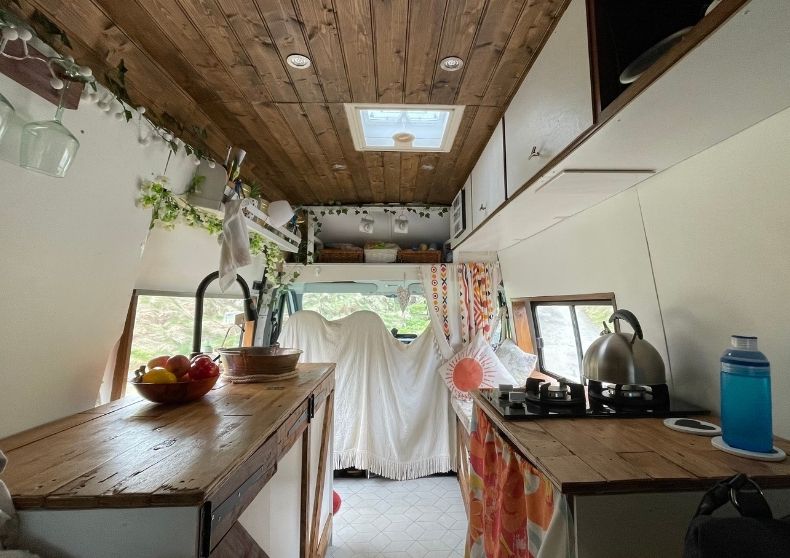
Ceiling
Once our flooring was down, we moved onto the ceiling.
We envisioned a rustic barn style theme for our van, so we decided on pine cladding that we varnished with dark oak paint.
There are a lot of benefits to having cladding as your ceiling. It’s affordable, lightweight, and looks great when finished.
However, I’d be lying if I said it wasn’t an absolute ball ache to install. Mainly because it was of how time-consuming it was and how much there was to consider. Our process was this:
- Varnish each batten using a dark oak wood stain – leave to dry overnight.
- Connect the cladding in batches of 3-5 – to save time when they’re on the ceiling.
- Run a light bulb of wood glue at the connection point & leave to dry overnight.
- Locate where LED spotlights will go and make cut-outs in the battens.
- Pop the lights into position, ensuring the cable is accessible for wiring later.
- Starting in the middle, screw the cladding into the ceiling frame.
- Wire the LED lights in parallel, ensuring the first light in the circuit has a long enough cable to reach the electric garage.
It sounds pretty straightforward, I know. It was more time consuming than anything, and it got tricky at times due to the natural curve of the van.
We had to cut some pieces of cladding at funny angles just so we could get them to meet and look tidy. It was trial and error, but we got there in the end.
We absolutely love our ceiling, and we are glad we did it. But if you do want to save yourself some time, you could look at alternatives such as flexible ply.

Step 11: Cable Runs
If you want your cables to be hidden behind your walls, now is a good time to set your cable runs in place.
We made the mistake of putting our walls up first, which meant we had to take them down later. Again, no big deal, but it’s a job worth avoiding.
You needn’t have your batteries or anything in place, and you don’t even need cables at this point.
The easiest way is to run conduit tubing from where your garage will be to the location of each of your sockets and appliances.
Conduit will allow you to feed your cables through at a later point. You’ll just need to make sure that it’s easily accessible and doesn’t get squished.
Related Read

Step 12: Walls & Window Frames
Now you have all of that in place, you can start putting your walls up.
We used the existing 6mm ply already attached to our van’s walls and doors, as I mentioned earlier.
Not ideal since the ply was very rigid, so it meant losing a few cm of space in parts. We thought it was no big deal, but it made all the difference with the bed – more on that later.
The ply sheets also didn’t meet the ceiling. But that was OK as we just had our cladding curve round on one side and built overhead storage on the other.
Other than that, they were ideal and saved us from buying new ply and spending time cutting it to shape.
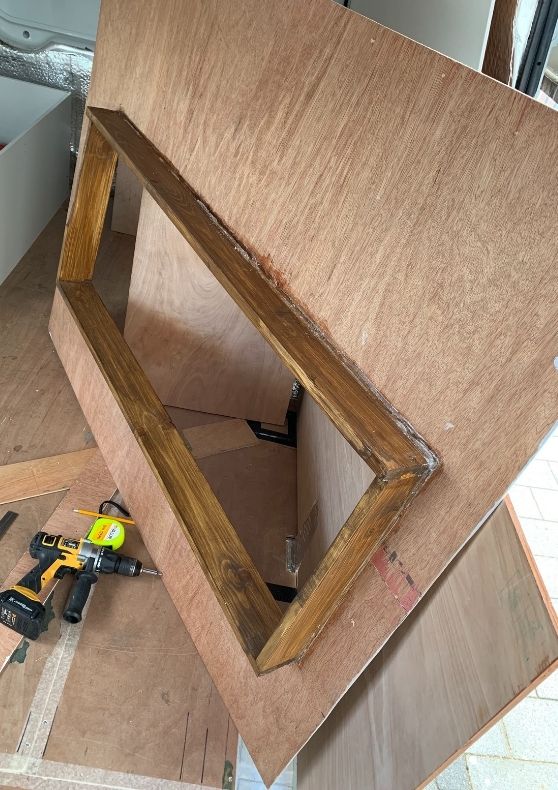
The first step was to cut in the holes where our windows would be. Since nothing is perfectly straight in a ford transit campervan, calculating where to cut wasn’t easy.
All we could do was start with a small hole and gradually make it bigger until we could stencil the edges. Perhaps there’s an easier way, but we couldn’t find one.
In the meantime, we built our own window frames using 90-degree wood joints and painted them with the same oak wood stain as our cladding.
We attached the window frames to the walls using a thick bead of sealant and leaving them to set overnight.
Then, all that was left to do was screw the walls into our wall frames. For the sliding and back doors, we drilled the walls directly into the inner skin of the van’s body.
Despite all good intentions not to have to access behind the walls again, the chances are you might have to.
With that in mind, it’s worth loosely fitting them at this stage and securing them later on.
Tip – we covered our wheel arches with some leftover vinyl flooring instead of boxing them. This protected them and allowed us more storage space in our box seats.
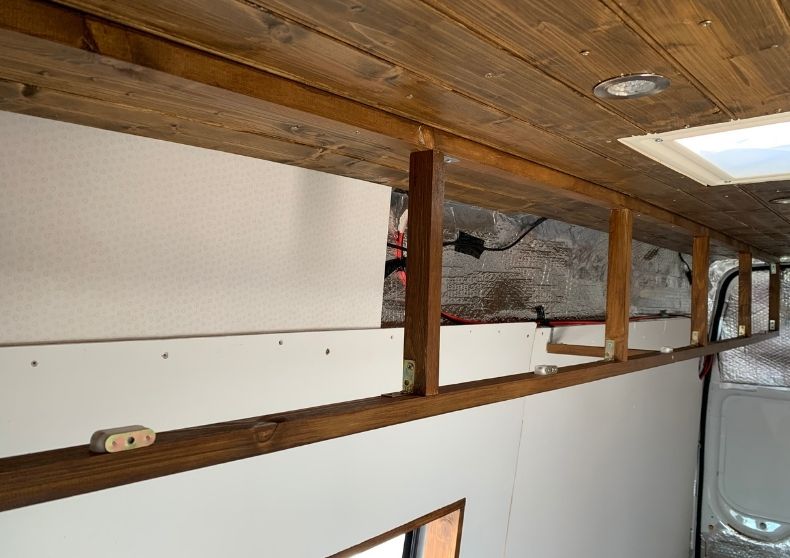
Step 13: Overhead Storage
Now you’ve got your ceiling and walls up, you can build your overhead storage – if you need it, that is.
It can seem like a daunting job, I know. But if you want plenty of storage space in your camper, having overhead storage compartments are a must.
I’m sure there are numerous ways that you can build overhead storage. You might find it helpful to search on youtube for some guidance.
We made ours by building a frame on our existing wall and ceiling framework and then adding extra batons horizontally and vertically until it was sturdy.
Many people join the wood using the pocket hole method; however, we secured ours with plenty of brackets. We then used plywood for the base and doors.
I’ll be putting together a step by step on our process shortly, so keep an eye out for that.
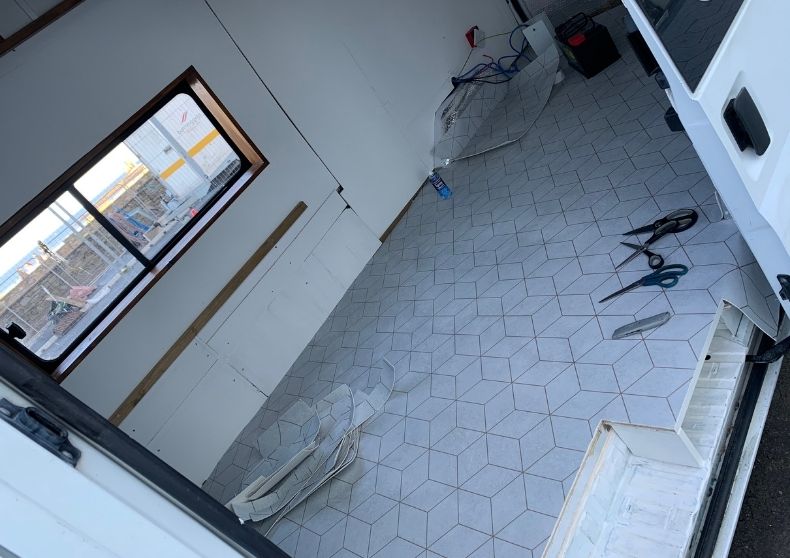
Step 14: Final Flooring
Since you’ll soon be building your units and furniture, now’s the ideal time to lay your final flooring. We had already built the foundations of our units at this point but didn’t secure anything until the flooring was down.
Again, you might want to shop around for the best campervan flooring to suit your build and theme.
We went for vinyl since it’s inexpensive, waterproof, and easy to clean. And as we felt we had enough wood going on, we opted for a cool geometric design instead.
By using some heavy-duty glue spray and double-sided tape around the edges, it was pretty straightforward to lay. It also looks great!
However, we have since realised that it dents or pierces very easily as it’s only 12mm thick. If you choose to go with vinyl flooring, perhaps go for something thicker.
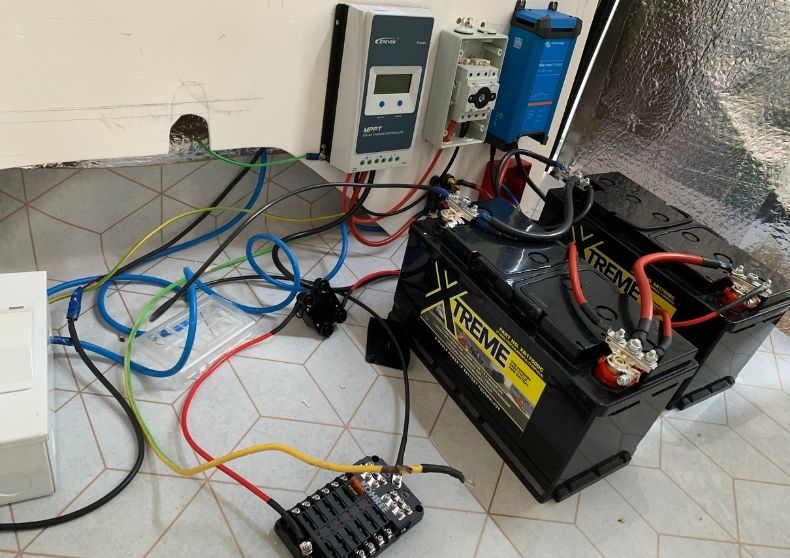
Step 15: Electrics
Since our electrics are stored inside our bench seat, we wanted to get the bulk of the setup done before those went in. Otherwise, it would have been too fiddly to work with.
This involved building a secure frame for the batteries, so they don’t move around while driving. Our method was to use ply batons secured to the floor frame.
I also did most of the wiring at this stage to make it easier for myself later. I also secured things like our battery charger, solar charge controller, and inverter into place.
While it’s hard to guide you through this process without knowing your electric setup, I have some guides to help you.
I’ll link them here, and you can check them out whenever you are ready.
Tip – If you are storing your electrics in a closed box, you’ll need to drill vent holes on both sides to allow airflow.
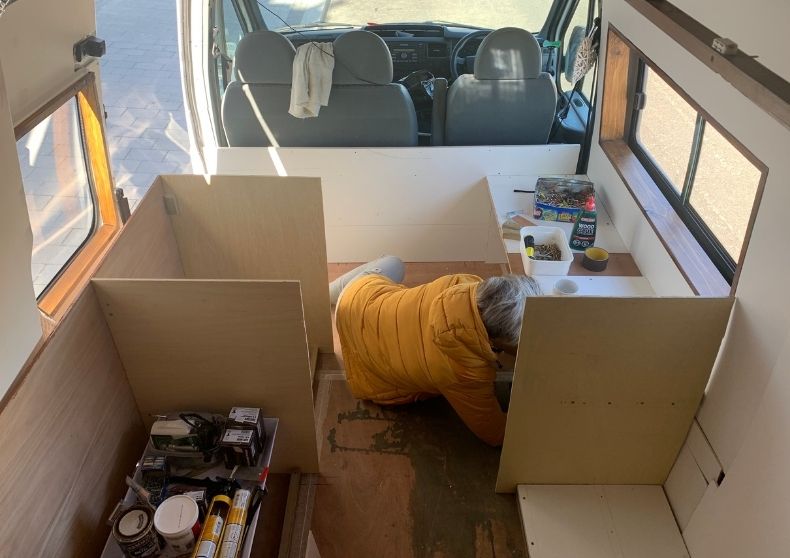
Step 16: Building the Furniture
OK, we’re getting there! It’s a lot to take in, but we’re almost there. You deserve a pat on the back if you’re still with me.
Here comes the fun part, as now you have the foundations to build the home on wheels you’ve been dreaming about.
Of course, you already have your layout planned as per step 3. But at this stage, you can really envision the space and make any last-minute changes.
Consider all the things in your transit camper conversion again. Think about your water tanks, electrics, toilet, shower, gas, fridge, and any other features you might want.
You need to know each of their dimensions so that you can build your units big enough to fit them.
Again, here’s a quick run-through of what units and furniture we went with in our van to help you plan your own.


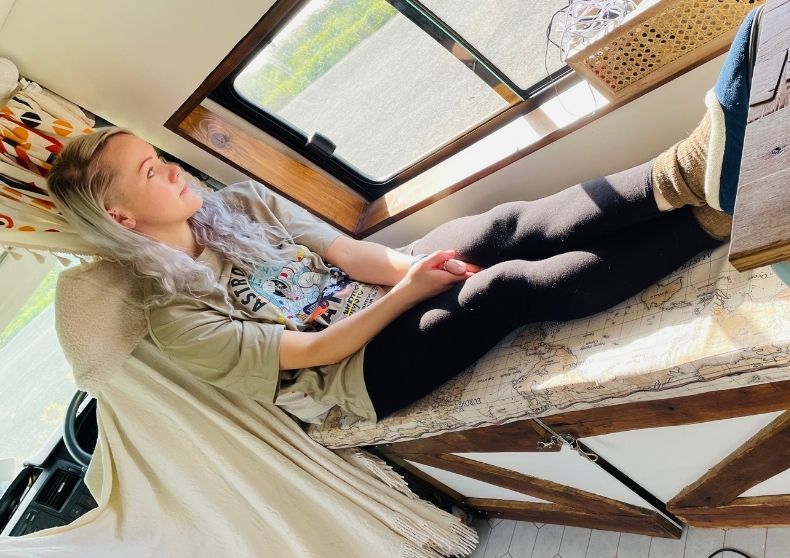
Bed/Dining Setup
We knew we would be spending a lot of time working in our van. Therefore, having a comfortable area where we could sit was an absolute necessity.
This meant that we needed to build a bed that could convert into a dining table and chairs during the day.
A lot of thought and detail went into this process, and we’ve had to make numerous changes since the initial build. With that in mind, I’ve got an entire blog post coming on that soon.
For now, the final result is as per the photos you see above.
Bench Seat
For days when we can’t be bothered to make the bed, we have a bench seat towards the front of our van.
It’s in the perfect spot as it’s directly adjacent to the sliding door. So we can sit and read or have lunch while enjoying a nice view.
It’s also a great spot to keep Ronnie while we are tidying up or getting ready.
To build the bench seat, we broke down some unwanted wood shelving and used brackets to secure it to the framework.
![]()
![]()
Cupboards/Doors
Our DIY camper cupboards are relatively simple.
First, we used 12mm thick ply for the ends, back and divides, which we secured to the wall and floor frames using brackets.
For the doors, we wanted to continue the rustic barn theme while also having something a little bit creative and unique.
To create the ‘Z’ design in the photo, we used 12mm plywood and some old pallets. We cut the pallet wood to size and then glued it to the ply, leaving it to set overnight.
We then used those cool barn style hinges to complete the look and added magnets to hold the doors shut while we drive.
Tip: Cut your cupboard doors about 10cm shorter than they need to be. This way, they won’t drag on the floor when you open them, and they make nice pocket holes for your feet.
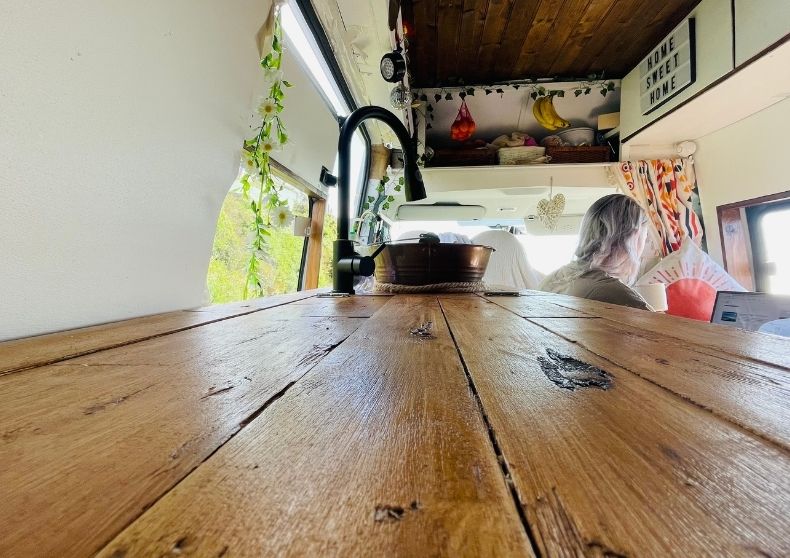
Countertops
Continuing with our rustic theme and sticking to our recycling mission, our countertops are another make-shift design.
Like our cupboard doors, we used 12mm ply and pallet wood to create the design you see in the photo.
For the most part, this idea worked really well. The problems only came when we wanted to cut holes for the sink and the hob.
Since it isn’t a solid bit of wood, we had to take extra care not to crack the pallet wood when cutting it with the jig.
I know what you’re thinking – we do like to make things difficult for ourselves. But hey, we got there in the end and saved ourselves a ton of cash. So was it all worth it? Maybe.

Related Read
Bathroom
As we didn’t end up having an indoor shower, we decided we’d give ourselves a little bathroom area instead.
We wanted a place where we could use the toilet without blocking the walkway. And also an area where we could sit and do our make up without getting in the way.
So as you can see, we’ve created a nifty little space for ourselves. Using hinges to join the countertops allows one side to lift up and hook to the wall.
We love this quirky addition to our ford transit camper build. It really does help prevent the space from getting cluttered. It also helps with privacy!
Shop Drill
Shop Jigsaw
Shop Angle Ruler
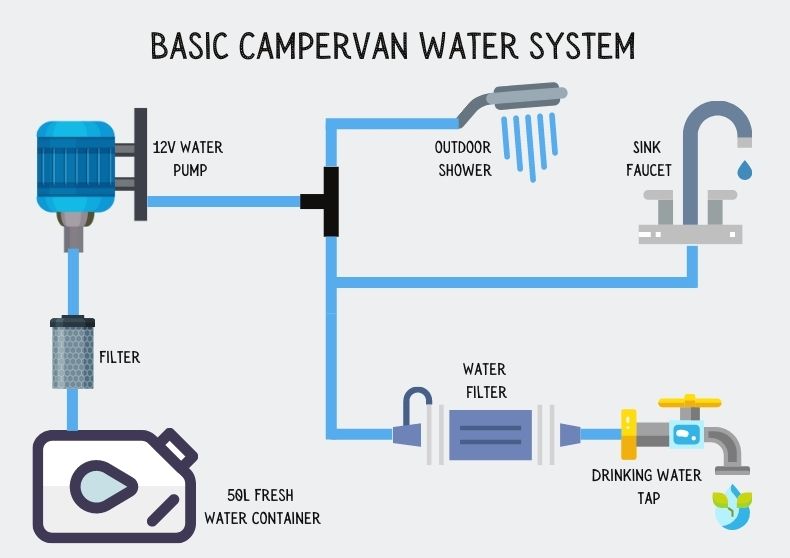
Step 17: Water System
The water system you have in your ford transit camper can be as basic or as complex as you like.
Some people get by carrying bottles of water and a bucket. Others go all out and have a fully functioning heated shower with huge underslung water tanks.
We agreed somewhere in between would get us by fine, and our setup is quite simple.
It’s a cold water supply system with 2 x 25-litre water containers, a 12v water pump, a filter, a sink, taps, and an outdoor shower.
Having a basic setup meant the plumbing side of things was relatively straightforward. I highly recommend this video if you need some help with that side of things.
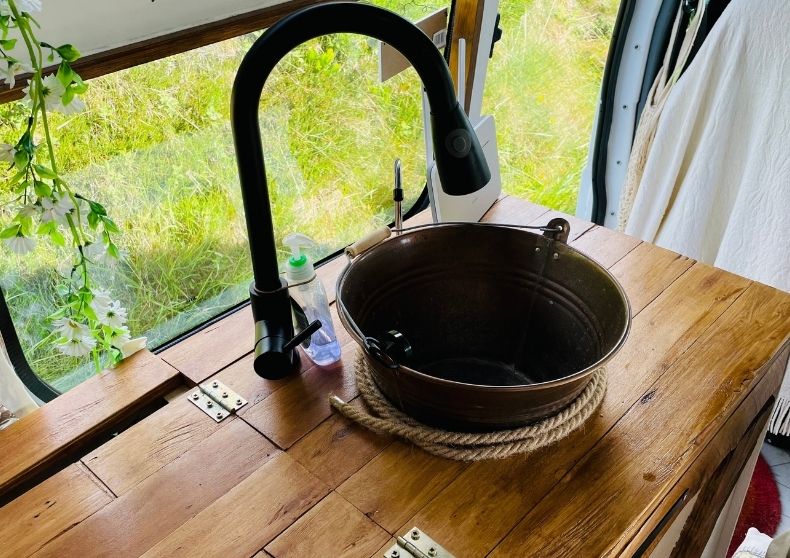
Sink
Our sink we made ourselves using an old rustic bucket. We sealed the seams to make it watertight and drilled a hole into the base to fit the plug and drain.
We then fitted a flexible pipe that drains our grey water into another small container that we regularly empty in roadside drains.
Outdoor Shower
Having an outdoor shower works for us since we spend a lot of time in warmer climates.
We have a privacy tent for when there are other people around us and use eco-friendly products to help protect the environment.
Admittedly, it would be nice to have hot water for showers, so that’s something we might add later.
Taps
We have two taps in our water set up. One for general use like washing and doing the dishes. The other is a drinking water tap.
Both connect to our water pump, which pumps water from our water containers whenever the taps are switched on.
The only difference is that the water coming through our drinking water tap goes through a water filter first.
This means we always have access to clean, filtered water, even in places where the purity of tap water is questionable.
Shop 12V Pump
Shop Drinking Water Kit
Shop Taps & Faucets
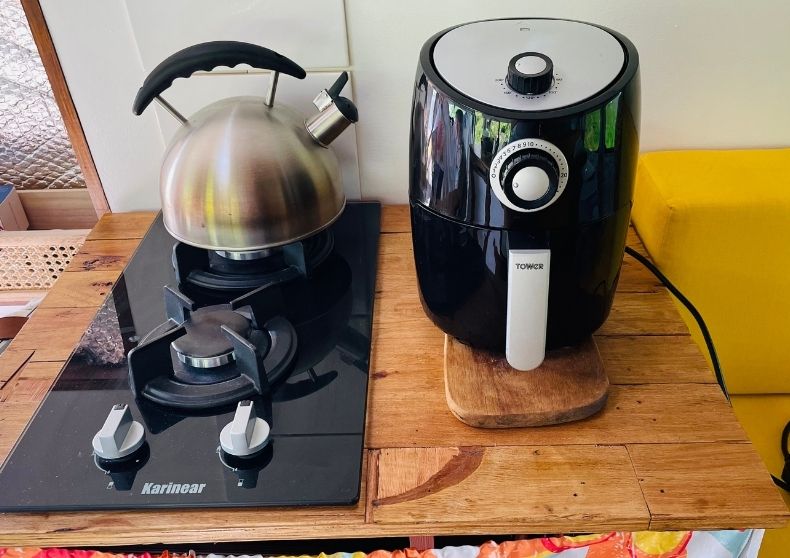
Step 18: Cooking Facilities
Here’s another area where you can go all out fancy with an oven, microwave, hob, and all that jazz. Or you can keep it simple with a basic camping stove or bbq.
Again, we went straight down the middle. We went for a fitted gas double hob inside the van and a low watt air fryer which is ideal for oven food.
Our favourite way to cook by far is using our pop-up bbq. There’s nothing like finding a beautiful park up in the summertime and cooking up a storm outdoors.
Only you know what cooking facilities will suit your vanlife style.
But I will say, unless you plan on spending all your time on campsites, steer away from having too many electrical items.
That’s why we decided on a gas hob over an electric one. We like to camp off-grid as much as possible, so the less demand on our leisure batteries, the better.
If you end up fitting gas, here’s an excellent guide to help you with the installation.
Shop Camping Stove
Shop Air Fryer
Shop Pop-up BBQ
Step 19: Campervan Accessories
As we round off the article, let’s look at some of our must-have campervan accessories.
I could talk forever on this point, so I will save a lot of it for another article; however, these accessories are things we simply couldn’t be without in our Ford Transit camper.
Toilet
Keeping in line with the eco-friendly theme, we opted for a compost toilet. It was by no means the cheapest option; however, we don’t regret our decision one bit.
Whereas chemical toilets require specific dumping stations, it’s much easier to dispose of waste from a compostable toilet.
Urine can be dumped pretty much anywhere you would pee. So down another toilet is the ideal option. Or if you’re out in the wilderness, a dirt road or barren land work just fine.
Solids can be left to compost, but this takes time. A fair while longer than it takes for our solid waste bin to be full.
Instead, we bag our solids into biodegradable bags before placing them into a bin. It sounds grim, but it’s no different from binning a baby’s nappy or dog poo.
Fridge
To keep your food fresh and, most importantly, your beers cold, you will want to have some kind of refrigerating unit in your van.
Ours is a 50L compressor fridge freezer which we run directly off our leisure batteries. It was expensive, but it works like a charm.
Compressor fridges are notoriously expensive since they are the most energy-efficient. They work like the fridges you’ll find in your home, only a 12v version.
Other campervan fridge options include three-way fridges and cool thermoelectric boxes.
Heater
When converting our van, we didn’t plan on spending too much time in it during the colder months, so we decided against installing a diesel heater.
Instead, we bought a 600w electric heater that we plug into our inverter. It does the job, but it takes a long time to heat the entire van and uses a fair bit of power.
Since spending more time in the van and realising that we will be in it more than expected, we’ve decided to install a diesel heater for next winter.
We were put off initially by the price and the idea of having diesel inside the van.
However, we’ve since learnt that the upkeep of a diesel heater makes up for the upfront cost, and they can also be run directly off of the vehicle fuel tank.
Of course, this isn’t the only way to efficiently heat your campervan. You could also explore wood burners and gas stoves.
Shop Compost Toilet
Shop 12V Fridge
Shop Electric Heater
Step 20: Safety & Formalities
Congratulations! You’ve done it! You’ve converted a ford transit van into a campervan.
But before you head off on your first van life adventure, here are some final safety tips and formalities to keep in mind.
- Gas & Electrics Compliance: If you’re fitting your gas and electrics yourself, it’s wise to have a licensed professional give it the once over and confirm it’s safe for use.
- Fire Safety: Keep a fire extinguisher, fire blanket, and a window hammer in the van and make sure they are easily accessible.
- Gas Safety: Only use gas when the van is adequately ventilated and install a carbon monoxide alarm.
- Documentation: Inform any necessary parties that your ford transit van is now a campervan. This includes your insurance and your vehicle licensing authority.
Related Read

Good Luck
with your Ford Transit Campervan Conversion!
There you have it! A step by step run-through of our camper conversion journey. I hope you’ve found it helpful and that it helps you with your own transit camper build.
If you have any questions or feel we have missed anything, please do not hesitate to reach out in the comments section. We are always happy to help!
Good luck!

For more help with your campervan conversion, check out our van build series.
PIN IT FOR LATER

Katie
Monday 2nd of October 2023
Thanks for the breakdown, will use your guide as I go through my own van-conversion process.
I may have missed it but approximately how much did the conversion cost (minus the price of the van itself)?
Doug
Tuesday 13th of June 2023
An enjoyable blog and nice camper van! Good work ladies!
Greetings from Utah!
Our Taste For Life
Wednesday 2nd of August 2023
Hi Doug, thank you for taking the time to comment! So glad you like the article and our camper, we share more of it on Instagram if you'd like to follow along. Greetings from the rainy UK!