
Trekking Annapurna Base Camp in 7 days is totally doable. And in this guide, I will show you how. I’ll be sharing a recommended Annapurna Base Camp itinerary, alongside everything else you’ll need to know to conquer the trek.
If you are looking for a 1-week trek in Nepal, that will lead you high into the Himalayan mountains, look no further than Annapurna Base Camp.
Sitting at an altitude of 4130m, it is by no means an easy feat. But, if you are reasonably fit (in both body & mind), you should have no problems completing the Annapurna Base Camp Trek in 7 days.
Saying that there’s a lot of planning involved. Permits, guides, equipment, itineraries, budget – there’s a lot to consider if you want to do any trekking in Nepal.
As the saying goes, it’s easy when you know how. So we have taken all of our knowledge and experiences to put together this reliable guide.
Hopefully, it will answer any questions you have ahead of your Annapurna Base Camp Trek.
Trekking Annapurna Base Camp – A Complete Guide
Disclosure: Some of the links in this post are affiliate links. That means that if you purchase a product through these links, we will earn a small commission, at no extra cost to you. And we can continue bringing you free tips and advice. If you found the content helpful and are kind enough to use our affiliates – you are awesome, and we thank you!
Annapurna Base Camp Trek in 7 Days – Difficulty
Although this trek is considered pretty moderate relative to other routes, completing the Annapurna Base Camp trek in 7 days is no easy feat.
This timeframe gives you very little time for rest days, and you should expect to be walking for at least 6-7 hours per day.
The trail itself is easy to navigate. Other than some rough terrain as you reach higher altitudes, you can expect smooth trekking conditions.
Of course, trekking to 4130m doesn’t come without its challenges. The continuous inclines and declines mean that coming down can be just as tiring as going up.
Nevertheless, this trek is a once in a lifetime kind of opportunity, and completing it will leave you with a palpable feeling of achievement.
With the right training and mindset, you can and will, accomplish this challenge.
Following these training tips for trekking to Annapurna Base Camp, will help you to prepare both mentally and physically for the trek.
Best Time for Trekking Annapurna Base Camp
The best time to trek Annapurna Base Camp is considered to be Spring (February to May) or Autumn (September – December).
Springtime is meant to be warmer, although I have read it can be a little unpredictable with the weather.
For the best chance of clear conditions, we recommend trekking in the Autumn. You do not want any clouds getting in the way of the striking mountain peaks.
October & early November are the peak months for trekking Annapurna Base Camp. You can expect the trail to be busy and may even struggle to get a room in some places.
Not only that, prices tend to go up during this time as well.
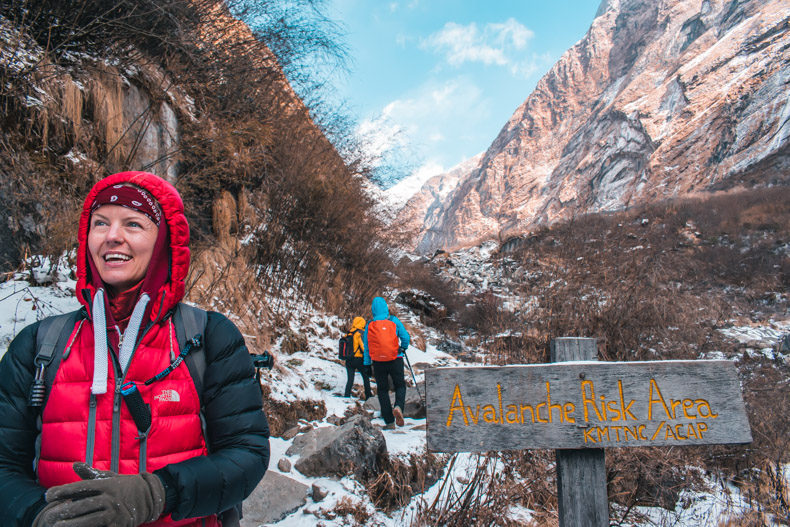
We completed our trek to Annapurna Base Camp in early December. The visibility conditions were perfect; however, it did get extremely cold as we reached the higher altitudes.
The temperature at base camp reached -14 degrees, and there were even some avalanches during this time.

Do I Need a Permit?
To trek to Annapurna Base Camp, you will need to obtain a TIMs card and a permit from the tourism centres in either Pokhara or Kathmandu.
The process is simple; however, there are some things you need to consider. To this end, we have put together a simple step by step guide that will help make this process straightforward.
See this guide on getting an Annapurna Trekking Permit.
Do I Need a Guide or Porter?
In an effort to keep costs down, we decided to trek to base camp without a guide or porter. We did some research beforehand and were pretty confident we wouldn’t get lost on this relatively developed trail.
For us personally, it turned out to be the right decision. There are signs in every village that point you to the next one, and it would be difficult to make a wrong turn.
Not only that, but you’re never too far from another group on the trail. Unless you are keen to learn more about the local culture and environment, a guide is not necessary.
You also have the option to hire a porter who will carry your belongings for you on the trek. Again, we decided against this as we wanted the challenge for ourselves.
We packed light using this Annapurna packing list and left behind most of our belongings at our guesthouse in Pokhara.
Paying for a guide and porter can significantly increase the cost of your experience. Prices start at $25 per day for a guide and $15 a day for a porter.
While it would have been nice to provide a job for local, unfortunately, we did not have the budget on this occasion. This allowed us to complete the ABC trek on a budget of $25 per day.

Annapurna Base Camp Trekking Route
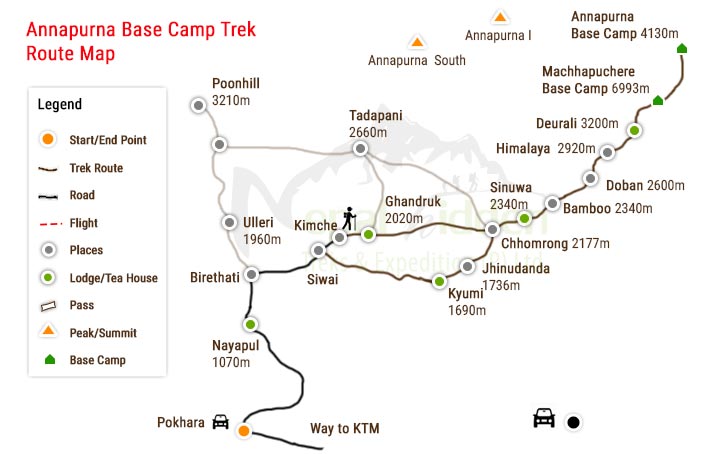
- Day 1 – Pokhara to Ghandruk (2012m)
- Day 2 – Ghandruk to Chomrong (2170m)
- Day 3 – Chomrong to Himalaya (2920m)
- Day 4 – Himalaya to Annapurna Base Camp (4130m)
- Day 5 – Annapurna Base Camp – Chomrong (2170m)
- Day 6 – Chomrong to Siwai (1530m)
- Day 7 – Siwai – Pokhara

7 Day Annapurna Base Camp Trek Itinerary
Here is the exact itinerary we followed to complete the Annapurna Base Camp Trek in 7 Days.
I will give you an idea of what to expect each day, the difficulty level, and where we recommend you sleep in each mountain village.
Day 1 – Pokhara to Nayapul

We woke early and took a taxi from Pokhara to Baglung Bus Station (350NPR/$3.00).
The buses depart from the station every half hour or so and we arrived in time to make the first departing bus at 6.30 am.
We waited no longer than 20 minutes until the bus was full. Uncomfortably full you might say, but it’s the cheapest way to reach Nayapul where you commence the trek. The price of the bus is 200NPR ($1.80).
Including a bathroom and breakfast stop, the journey time to Nayapul is just over 2 hours. It’s a bumpy and uncomfortable journey, but the astonishing views along the way make up for it.
From Nayapul, the first leg of the trek commences. The starting point is already at an elevation of 1000m so you’re almost a quarter of the way there!
Nayapul to Ghandruk (2012m)
- Elevation: 1000m
- Time Trekking: Approx. 5 hours
- Difficulty Level: 4/10
Not far from the drop off in Nayapul is the TIMs checkpoint, so you will want to ensure you have all your documentation ready for checking.
The first hour or 2 of this hike isn’t so exciting, as you are limited to dusty roads to walk on. When you start seeing the first signposts for Ghandruk, that’s when you can detour.
There will be stairways that lead you through terraced fields, verdant nature, and mountain villages. Keep your eyes peeled as they could be easy to miss.
You will often encounter times when the routes fork off. Don’t worry which one you take, as ultimately they all end up in the same place.
It’s a gradual yet continuous uphill climb from Nayapul so it can get tiring. You will find quaint villages and tea houses every hour or so, should you need to stop for refreshments.

Where we Stayed: Trekkers Inn
- Cost: 800 NPR ($7) for a double room. (we later found out this was expensive for tea rooms but we paid for the privilege of an en-suite bathroom)
- Amazing views of Machhapuchhre (fishtail) mountain when it’s clear skies.
- Comfortable rooms and good food.
* Tip: Dhal Bhat is the ‘go to’ dinner choice among trekkers. It’s a little more expensive, but you get unlimited refills which you’ll be grateful for after a long day of trekking.
Day 2 – Ghandruk to Chomrong (2170m)

- Elevation: 170m, but there’s a lot of up and down on this leg.
- Time Trekking: Approx. 7 hours including lunch breaks, taking pictures etc
- Difficulty Level: 7/10
Wake early and eat well in preparation for the long day ahead. On a clear day, you can expect enchanting views of fishtail mountain from Ghandruk.
Set off around 8 am to allow enough time to reach Chomrong before dark.
It’s a bit of a maze getting out of Ghandruk, so don’t be afraid to ask for directions. Once you’re on the right trail, it’s a straightforward journey.
You’ll encounter a variety of terrain, including quarries, woodland, rice fields, and villages.
It’s a challenging trek, taking you down into the valleys and then back up again. But it’s also beautiful and serene.
You’ll want to break for lunch in Kimrong Khola as the toughest part of the journey lay ahead of you. The incline from here is a k!ller – a 700m ascent with no tea houses along the route.
Thankfully, once you reach the top, it’s just a 1 hr walk downhill into Chomrong.

Where we Stayed: Panorama View Point
- Cost: 500 NPR ($4.50)
- Includes solar-powered hot shower.
- Incredible panoramic view of Annapurna.
- Comfortable rooms and good food.
- Electric Charging Points
*Tip – Panorama View Point is one of the first Tea Houses you’ll approach when entering Chomrong. Although we recommend it, there are lots more to choose from if you continue down into the village.
Day 3 – Chomrong to Himalaya (2920m)

- Elevation: 750m
- Time Trekking: Approx. 7.5 hours including lunch and various breaks.
- Difficulty Level: 8/10
Wake early to watch the sunrise. It’s an ethereal beauty as the first golden light hits the snowcapped mountains. Then grab a hearty breakfast to give you plenty of energy for the gruelling day ahead.
Upon leaving Chomrong, you will have to present your permit to the checkpoint there. It’s then a steady walk down into the valleys before starting a challenging ascent to Sinuwa Village.
The walk from Sinuwa leads you through enchanting woodlands. It’s a beautiful part of the trek and not so tough on the tired legs.
Break for lunch in Bamboo Village and consider having garlic soup that is said to help with altitude sickness.
The last leg between Bamboo and Himalaya is an absolute k!ller. It’s pretty much uphill the entire way, and the air becomes noticeably thinner.
You might even spot some monkeys, which confused us a little!
As you start reaching these heights, you will want to keep an eye on the weather. We tempted fate and ended up getting caught in rain, fog, and hailstones.
As a result, visibility was shocking, and it made the journey quite stressful. Check with the locals if you are unsure about the weather, and cut the day short if you need to.
In regards to where we stayed, I’m sorry but I forgot the name. There are only 2 tearooms to choose from in Himalaya and they’re both on par, so we went for the one that had a room available.

Altitude Sickness
If you’re not taking altitude tablets (or even if you are), you may start to feel some symptoms of altitude sickness at this point.
Headaches, restlessness and inability to sleep are some of the milder symptoms. Although unpleasant, you can probably continue the trek at a steady pace.
On the other hand, if you start vomiting or suffering severe shortness of breath, you should not try to continue higher. Allow yourself time to acclimatise before continuing the trek.
Day 4 – Himalaya to Annapurna Base Camp (4130m)

- Elevation: 1100m
- Time Trekking: Approx. 9 hours including lunch and lots of breaks
- Difficulty Level: 9.5/10
If you want to trek to Annapurna Base Camp today, you will want to leave no later than 8 am.
This will be the toughest day yet; however, it will also be the most spectacular. So fill your boots at breakfast and psyche yourself up – it’s going to be one hell of a journey.
Not long after leaving Himalaya, you will find yourself amidst an astonishing valley. Towering mountain ranges encompass you, almost like you are on another planet.
Depending on the time of year, it’s not uncommon to start seeing snow on the ground by now as well.
An emerald green river leads you through the valley, as you steadily advance the rocky terrain. It’s pretty damn magical and you might even say you were having a great time if you were not so breathless!
By the time you reach Deurali, you will want to stop to refuel. It’s about to get super steep for the final 800m climb.
Take your time on this last leg and have plenty of snacks handy for when you feel your energy running low. It is as mentally challenging as it is physical, so break when you need to and keep those spirits high.
Stop at Machapuchre Base Camp for a break and refuel. You’re almost there, and you’ll complete the last stretch on adrenaline alone.
The otherworldly views of the Annapurna mountain range carry you all the way into base camp. Time to celebrate – you made it!

Where we Stayed: Annapurna Sanctuary Lodge
With only 4 teahouses at ABC, you may have to base your choice on which one has a room available.
We can personally recommend Annapurna Sanctuary Lodge.
- Cost: 500NPR/$4.50
- The Dhal Bhat was delicious here.
- incredible views of the Annapurna range.
Day 5 – Annapurna Base Camp – Chomrong (2170m)

- Elevation: -2000m
- Time Trekking: Approx. 10 hours including lunch and breaks
- Difficulty Level: 9/10 – Mainly due to icy terrain between ABC and Himalaya.
You will not want to miss the sunrise at Annapurna Base Camp. It was honestly one of the most extraordinary moments of our entire lives.
The sun somehow seemed different up there, like it wasn’t really our sun. It appeared like a giant star amid an apocalyptic sky – a once in a lifetime spectacle.
Following that, you’ll be keen to get down as soon as possible. Depending on the weather, the journey could be a breeze, or it could be a nightmare.
For us, it was a nightmare, as the pathway had iced over. We didn’t have proper grips, and we (by we I mean Charlotte), fell over repeatedly!
The good thing is, it’s all downhill until Sinuwa Village. You’ll be tired, but it’s easier to get a stomp on. Especially with the promise of a hot shower and a warm bed ahead of you!
The hardest part of the journey will be the final climb up into Chomrong. I didn’t count the number of stairs, but they felt neverending at the time!

Where We Stayed: Excellent View Lodge
- Cost: 500NPR/$4.50 + 100NPR/$0.90 for hot shower
- Our favourite tea house along the whole trek
- Incredible views of Annapurna Range
- Amazing food – especially the pizza & banana pancake.
Day 6 – Chomrong to Siwai (1530m)


- Elevation: -650m
- Time Trekking: Approx. 6 hours including lunch and breaks
- Difficulty Level: 5/10
Other than those final steps out of Chomrong village, you’ll feel invincible breezing the rest of the route. You can even stop off at the hot springs in Jhinu to soothe those aching muscles.
It’s a complete change of pace and terrain. The prodigious mountains are replaced with quaint villages and lush nature.
From Siwai, you can catch the bus directly into Pokhara. The last bus leaves at 4, therefore you may need to spend the night if you miss it.
Alternatively, you can hire a jeep; however, expect to pay at least 4000 NDR/$35.96 for this.
Day 7 – Siwai to Pokhara
You did it! You completed the Annapurna Base Camp Trek in 7 days. Words cannot describe this feeling. The sense of achievement is unmeasurable.
Now book yourself a massage, enjoy the abundant food choices on offer, and give yourself a well-deserved pat on the back.

But, I Have Less Than 7 Days?
It would not be recommended to attempt the Annapurna Base Camp trek in less than 7 days.
This ABC itinerary already leaves very little time for unexpected circumstances. For example, if the weather gets bad or you need time to acclimatise.
Having said that, there are ways to shave off some time should you choose to.
First, instead of starting the trek in Nayapul, you can take a bus from Pokhara to Kimchi. This reduces trekking time by approximately 6 hours.
Alternatively, from Nayapul you can hire a jeep to Ghandruk, which will reduce trekking time by 7 hours.
For those with less than 7-days to trek, we recommend you consider the Poon Hill Short Trek or Pikey Peak Trek instead.
I Have Longer Than 7 Days?
If you have longer than 1-week to spend trekking in Nepal, we recommend you check out the Everest Base Camp Trek or Annapurna Circuit Trek.
Or for a trek that’s somewhat off the beaten track, why not try the Tamang Heritage Trail Trek.

Annapurna Base Camp Trek in 7 Days – Budget
Many people end up spending a huge amount of money on trekking to Annapurna Base Camp; however, we know from experience that this doesn’t have to be the case.
Trekking without a guide or porter, sterilising our own water, and taking plenty of snacks, are just some of the ways we saved money on the trail.
For more budget tips and advice for this trek, don’t forget to read how we completed the Annapurna Base Camp Trek on less than £20 a day.
Wifi and Internet on the Trail
While you are able to get wifi or cell signal at some points along the trek, we decided to have an all things internet detox!
No Instagram, No Facebook, No concerned messages from our parents… Nothing! And it was BLISS!!
Most tea rooms have Wifi but expect to pay around 200 NPR for the privilege.
Don’t Forget Travel Insurance!
It’s important to note that most standard travel insurance packages do not include high altitude trekking.
The risks of trekking at a high altitude are significant. We saw many people having to be helicoptered down due to altitude sickness or injury.
The cost of a helicopter rescue is $2500, so unless you can afford that, be sure to get suitable cover.
World Nomads are our favoured travel insurers as they make it super easy to make changes to your policy.
We contacted them the day before we were due to start our trek and a simple add on gave us cover right away. Get a quick quote using the button below:

Enjoy Trekking Annapurna Base Camp!
Completing the Annapurna Base Camp trek in 7 days was one of the best experiences of our entire lives.
It was a test of endurance of both the mind & body. It was working together as a team to overcome challenges. It was also validation that we can achieve anything that we put our minds to.
Thank you for reading. I hope this guide has helped prepare you for your own trek.
If you have any questions, don’t hesitate to ask. You can reach out to us in the comment section below or through our contact us page.
Stay Adventurous & Happy Travels,
Charlotte & Natalie x
Disclosure: Some of the links in this post are affiliate links. That means that if you purchase through these links, we will earn a small commission, at no extra cost to you. And we can continue bringing you free travel tips and advice. If you use our affiliates, you are awesome, and we thank you!
PIN IT FOR LATER


25 Responses
such informative articles about Annapurna Base Camp Trek love to see more articles in the future.